
Last Updated on 11/19/2019 by Mark Beckenbach
Feeling experimental? Why not try light painting with the help of today’s photography cheat sheet!
One of the coolest things you can do in low lighting conditions or complete darkness is light paintings to achieve fun and colorful effects. Whether you want to try something new or embellish a portrait with these effects, light painting will allow you to get experimental and creative with light and colors. With the help of today’s photography cheat sheet, you can practice with something relatively simple: using light painting to illuminate subjects in dim lighting.
The cheat sheet below is part of Digital Camera World‘s collection of tips for shooting in low light. Any subject will do for practice; this guide used some outdoor elements like plants, bushes, and bare tree trunks. You may want to practice in your backyard at night with light painting portraits of a friend, for example.
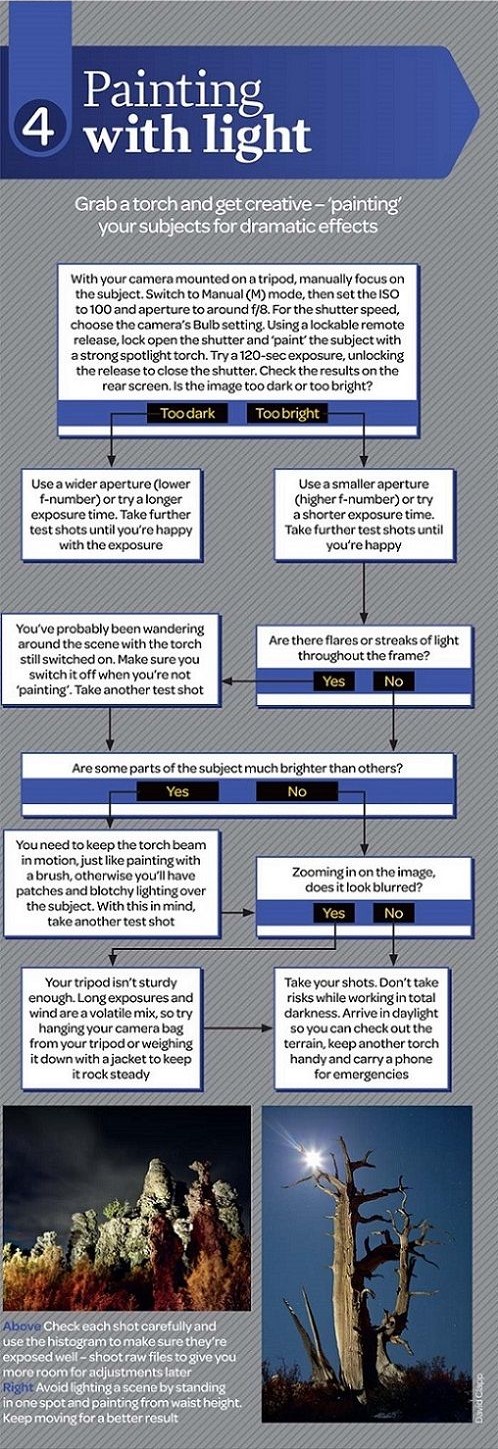
First, you’ll essentially be taking long exposures, so you’ll want to keep your camera mounted on a tripod throughout the shoot. Set your camera to Manual mode and switch to Manual focus. Set the ISO to 100, the aperture to f8, and choose Bulb mode for the shutter speed. Manually focus on your subject, then lock open the shutter using a lockable remote release. Using a strong spotlight torch, “paint” your subject for a 120-second exposure. Unlock the release to close the shutter.
If the result is too dark, try again with a wider aperture (smaller f-number) or increase the exposure time. If it’s too bright, do the opposite. Keep shooting until you get the result you like.
If there are flares or streaks of light throughout the frame, most likely, you were walking around the scene with the torch still on. Don’t forget to switch it off after the “painting” to avoid this. If some parts of the subject are brighter, make sure to keep the torch in motion, just like painting with a brush. This will prevent patchy and blotchy lighting on the subject. If the image looks blurred, this may be because your tripod isn’t sturdy enough, and the wind could be blowing on your camera. Put something like your camera bag or your jacket to weigh the tripod down and keep it steady.
That’s what you do with light painting, for starters. You can do lots of cool projects with light painting, as some of our featured photographers have!
Need more photography tips and tricks? We have loads more photography cheat sheets to check out!
Cover image by Patrick Rochon. Used with permission from a previous feature.
Get rid of the ads!
Did you enjoy reading this article as much as we enjoyed writing it? There's a way to support us and our reporting, getting ad-free navigation and more as a bonus. Subscribe to us for less than a coffee per month —just $3.99— or take advantage of our yearly subscription with a hefty discount for only $25.- An ad-free experience
- A free mystery box for Lightroom or Capture One
- All the books in our store
- 20% discount on Capture One
- 30% discount on Imalume Photo Theft Protection
- 20% off Herbs and Kettle Tea Company.