
If you’ve been wanting clear and bright portraits when shooting in low light, this photography cheat sheet will be of great help.
One of the most typical challenges you’ll encounter when photographing people is shooting in low light. Whether it’s shooting indoors in a dimly-lit location, or wanting to take snapshots of your friends in the streets at night, it can be frustrating — even with flash. Thankfully, today’s featured photography cheat sheet will help you with flash settings and techniques necessary to get good results in this challenging shooting condition.
The photography cheat sheet below is part of Digital Camera World‘s series of flowcharts for shooting in low light. This time, it specifically provides tips for portrait photos. If this is something you’ve been struggling with, you might want to give these tips a try.
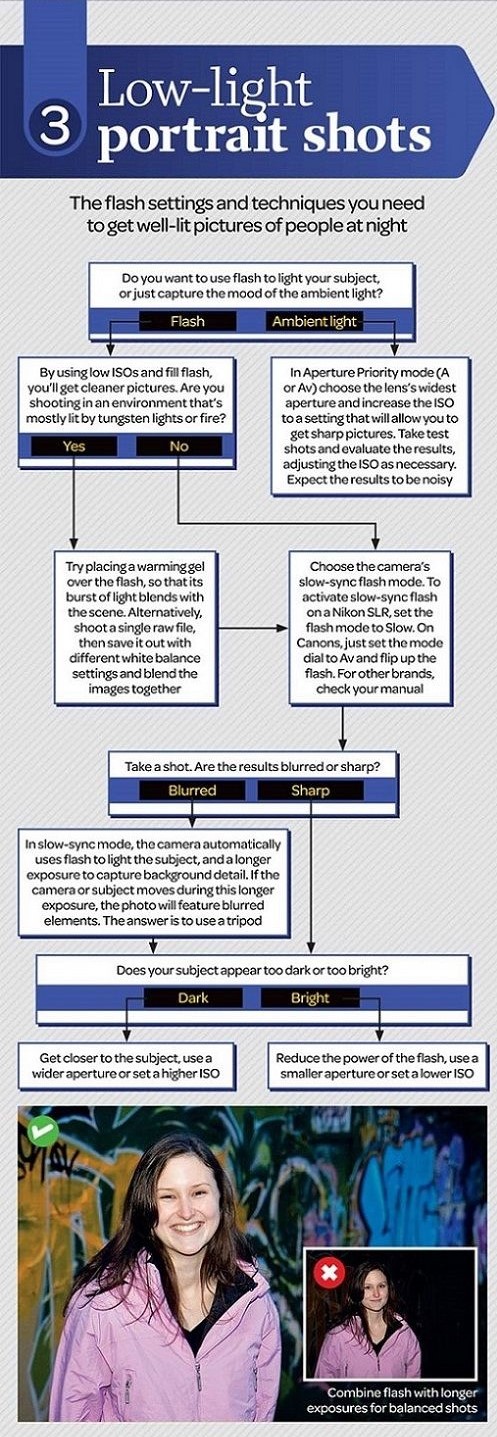
First, decide if you want to shoot with or without flash. The latter will require you to shoot with ambient light bright enough to produce decent results. There are now many digital cameras that offer outstanding low light performance. The former is a quick fix for getting brighter and cleaner shots, but it can also look too unnatural or unflattering.
If you decide to shoot in ambient light, simply set your camera to Aperture Priority mode (A or Av), choose the widest aperture of the lens, and increase the ISO to a setting that will yield the sharpest photos. Take test shots and compare them, as you may have to adjust the ISO to get the results you want. Expect noise in your snaps.
Otherwise, if you want to use flash, do so with low ISO settings so you’ll be able to get cleaner shots. If you’re shooting in a location lit mostly by warm lighting like tungsten bulbs or fire, you’ll have to use a warming gel over the flash. This will make the burst of light look warm and blend with the scene. Also, make sure to have your camera’s slow-sync flash (best to check your camera’s manual for this) enabled. Another way to do this is to shoot a RAW file, save a copy with a different white balance setting, and combine the images in post.
If your shot looks blurred, that’s because the slow-sync mode uses the flash to illuminate the subject and a longer exposure time to capture the background as well. So, make sure you either ask your subject to be still for the shot or use a tripod. Also, if your subject looks dark, you can either move closer to the subject, use a wider aperture, or use a higher ISO. Alternately, if it’s too bright, you can reduce your flash power, use a smaller aperture, or set a lower ISO.
Need more photography tips and tricks like this? Don’t forget to check out our collection of photography cheat sheets so far!
Get rid of the ads!
Did you enjoy reading this article as much as we enjoyed writing it? There's a way to support us and our reporting, getting ad-free navigation and more as a bonus. Subscribe to us for less than a coffee per month —just $3.99— or take advantage of our yearly subscription with a hefty discount for only $25.- An ad-free experience
- A free mystery box for Lightroom or Capture One
- All the books in our store
- 20% discount on Capture One
- 30% discount on Imalume Photo Theft Protection
- 20% off Herbs and Kettle Tea Company.
- 20% off your order from MPIX printing services.
- 5% off Viltrox Products via their eCommerce store.
- 10% off all film developing, printing and scanning services from Blue Moon Camera and Machine
- 15% off 7Artisans products: The lens and accessory maker is offering a sweet discount for Phoblographer's readers.