
Last Updated on 08/08/2019 by Chris Gampat
Learn how to take great food photography that goes beyond Instagrammable with key tips from this photography cheat sheet.
We all like to dabble in food photography, but there’s more to it than being good enough for likes on social media. If you’ve been wondering how to begin taking better, even pro-looking, food photos, we have a cheat sheet by Italian food photographer Jonathan Raho that could get you started. Here, we learn about a bunch of key elements for exploring the scrumptious side of photography. As with any kind of photography, it’s about leading the eyes of the viewer to the star of your photos (and of course, make their mouths water at how tasty the food looks!).
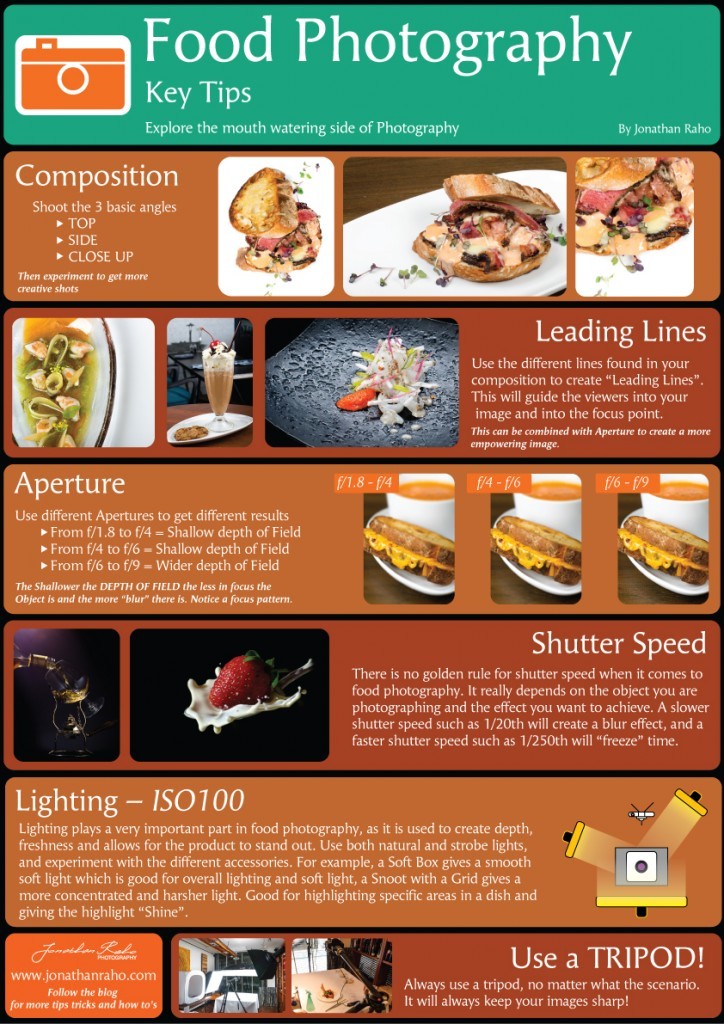
To achieve this, we have to take note of our composition, use of leading lines, aperture, shutter speed, and lighting for ISO as low as 100. Always use a tripod as well to keep your camera stable and your photos sharp. Make sure to get the three basic angles first — top, side, and close-up — before experimenting with other angles for more creative shots. Compose your shot with leading lines to bring the eyes to the focus of your photo. Pair this with different aperture settings to create a more striking result. Use apertures of f1.8 to f4 for shallow depth of field and blurred out background, and deeper depth of field to keep more elements sharp and in focus.
As for the shutter speed, there is no hard and fast rule: it actually depends on what you’re shooting and the effect you want to achieve. For example, if you want to experiment with movements and splashes for liquids, use a fast shutter speed like 1/250th to freeze motion. The cheat sheet also recommends using ISO 100 to keep the photos clear of noise. And to help keep all of these settings, you have to shoot with adequate lighting.
A combination of natural and strobe lights will create depth and freshness to the food items, and allows them to really pop from the shot. Accessories like a softbox will produce a soft and diffused light, which is flattering overall. A snoot with a grid will yield a harsher and more concentrated light, which works great if you want to highlight specific areas in a dish and give it some “shine”.
Ready to learn more and get inspired by our favorite food photography projects? Check out the tips, tricks, and features we have so far!
Get rid of the ads!
Did you enjoy reading this article as much as we enjoyed writing it? There's a way to support us and our reporting, getting ad-free navigation and more as a bonus. Subscribe to us for less than a coffee per month —just $3.99— or take advantage of our yearly subscription with a hefty discount for only $25.- An ad-free experience
- A free mystery box for Lightroom or Capture One
- All the books in our store
- 20% discount on Capture One
- 30% discount on Imalume Photo Theft Protection
- 20% off Herbs and Kettle Tea Company.