
Last Updated on 07/10/2019 by Mark Beckenbach
Low light photography can be challenging for beginners and experienced photographers alike. But with some tips and this cheat sheet, you’ll be on your way to getting started or improving your skills.
Been wanting to try low light photography but not sure how to do it the best way? There are also many ways you can find yourself having to shoot in limited light, and it can lead to many disappointing photos. But, with these tips and a cheat sheet that you can use as a reference, you’ll be able to adapt to the scenes and get beautiful low light photos.
The main challenge that comes with low light photography, as the term indicates, is the fact that there’s often not enough light to shoot with to get focused and correctly exposed shots. You could be shooting in a dimly lit indoor location, a street at night with only a few street lights on, or landscapes at dusk. Sometimes, using a flash either isn’t allowed (like with concerts and formal events), or not the right tool for what you’re shooting (street scenes, landscapes, and astrophotography).
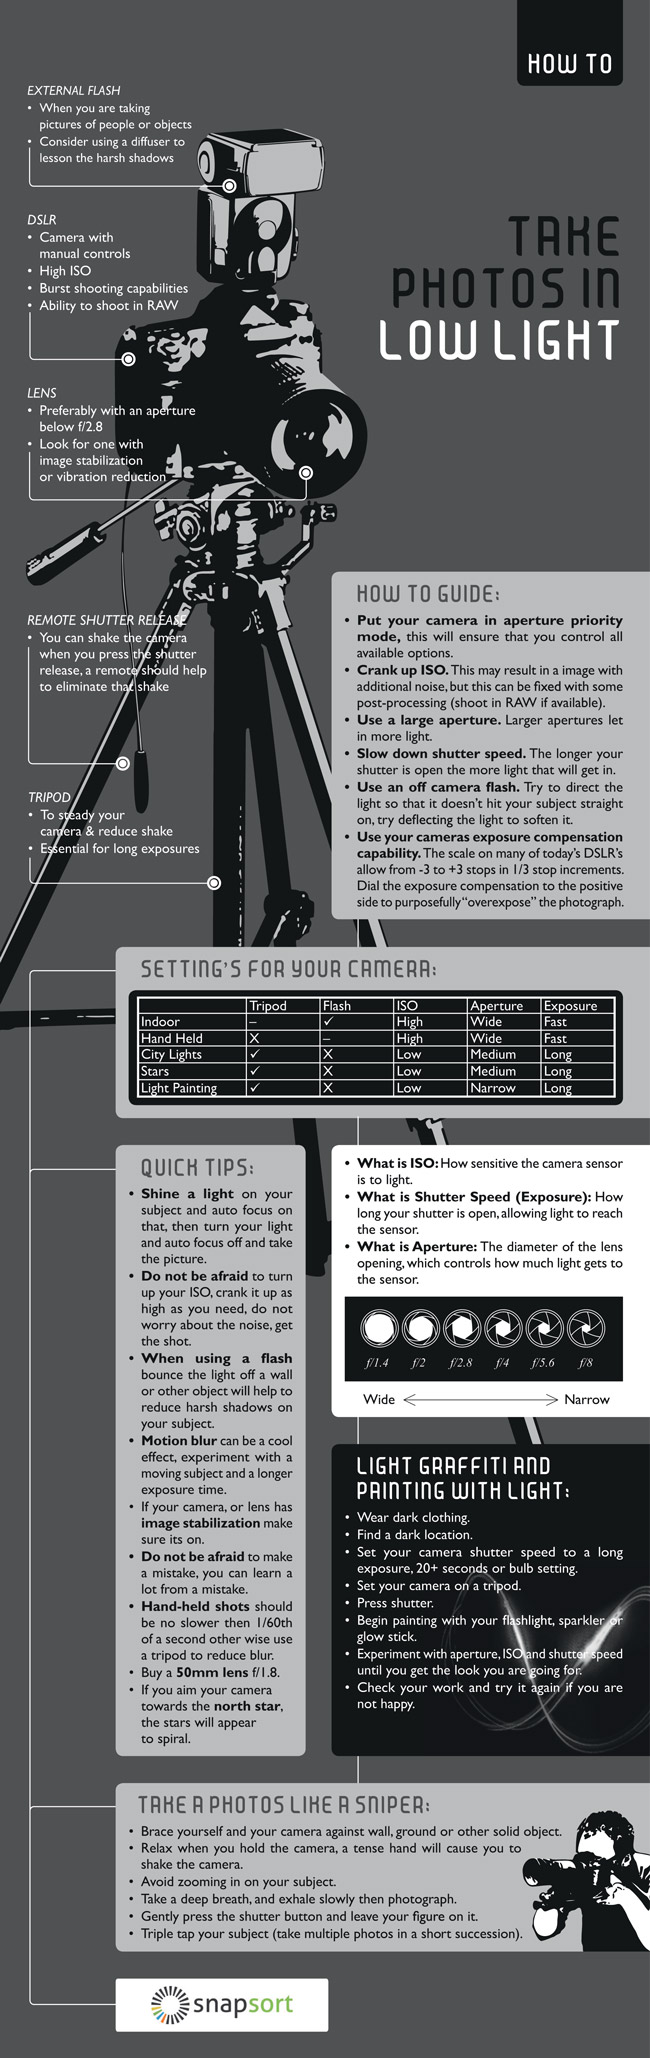
According to Snapsort, there are some things you can do about this. First, use a higher ISO to make your camera’s sensor more sensitive to the light. Cameras today are now capable of minimizing the noise, so you usually can get good results even at high ISO settings. Make sure to shoot in RAW format so you get the most flexibility and can take out some of the noise in post-processing.
Another trick is to use a larger aperture to let more of the light in. However, if you want to retain as much detail by shooting in smaller apertures (as you would let’s say a street scene at night, landscapes just before sunrise or shortly after sunset, or even Milky Way photos), you’ll have to instead slow down the shutter speed. Use a tripod if you’re shooting with shutter speeds slower than 1/60th of a second. If you can shoot with flash, it’s best to use an off-camera flash instead of your camera’s pop-up flash. This is because the latter hits your subject directly, causing a flat look. When shooting with an off-camera flash, angle it so the light doesn’t hit your subject directly. You can also use diffusers and reflective surfaces to soften the light. Lastly, use your camera’s exposure compensation functions. Dial it to the positive side to purposely overexpose your photos by one or two stops.
Now, let’s take a look at Snapsort’s infographic below, which you can use as a cheat sheet. Aside from all the tips mentioned above, it also includes some settings for the kind of photo that you want to shoot, plus some tips on light painting. Print it out and bring it with you during your shoots for a quick reference.
Get rid of the ads!
Did you enjoy reading this article as much as we enjoyed writing it? There's a way to support us and our reporting, getting ad-free navigation and more as a bonus. Subscribe to us for less than a coffee per month —just $3.99— or take advantage of our yearly subscription with a hefty discount for only $25.- An ad-free experience
- A free mystery box for Lightroom or Capture One
- All the books in our store
- 20% discount on Capture One
- 30% discount on Imalume Photo Theft Protection
- 20% off Herbs and Kettle Tea Company.
- 20% off your order from MPIX printing services.
- 5% off Viltrox Products via their eCommerce store.
- 10% off all film developing, printing and scanning services from Blue Moon Camera and Machine
- 15% off 7Artisans products: The lens and accessory maker is offering a sweet discount for Phoblographer's readers.