Creating the Photograph is an original series where we interview photographers about a photo that they shot and how it was achieved. The results are some knowledge passed on to you. Want to be featured? Email chrisgampat[at]thephoblographer[dot]com.
We found Joubert Loots via the recent EyeEm Awards. The image above featuring levitation was entered in as one of the finalists for the Illusionist category. Joubert’s EyeEm and Instagram accounts are filled with inspirational images–and not all of them are of the surreal/conceptual style that we see above. He is mostly a documentary street photographer but like most photographers, he tried his hand at other things in order to be experimental and grow.
Joubert’s image involves working in Lightroom and Photoshop–and it also involves using very rudimentary camera gear.
Here’s his story.
The Concept
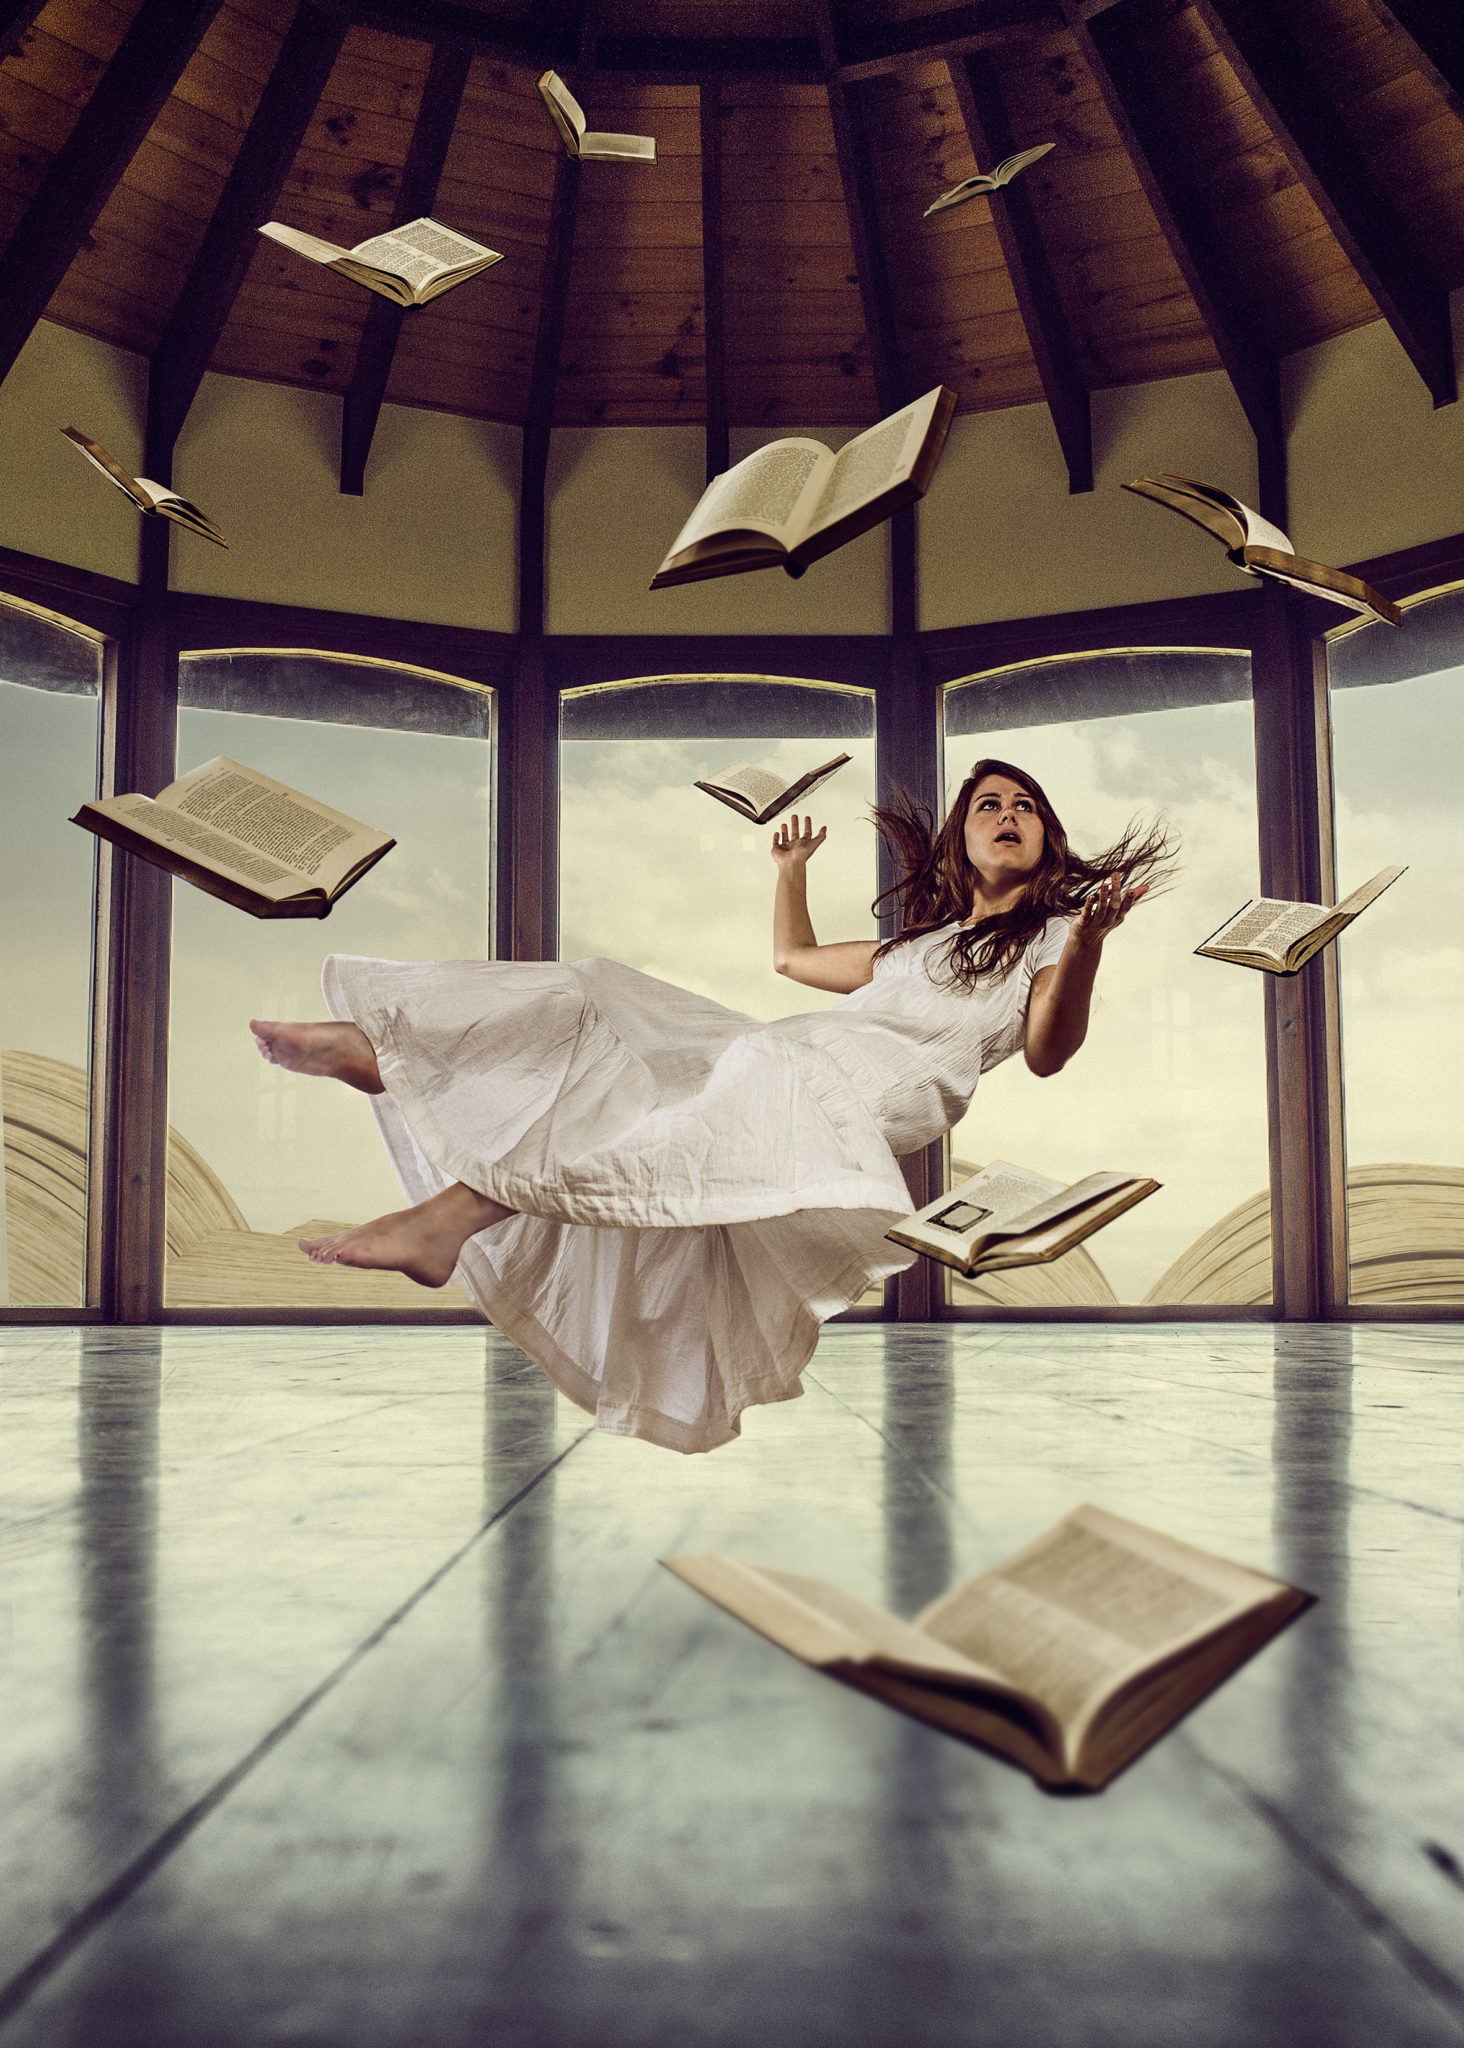
The concept for my composite revolves around knowledge, and the reality of having to deal with the overload of information that we process on a daily basis. Observing society and the overwhelming flood of `knowledge’, we aspire for wisdom from the extensive knowledge sources available today.
The aim is to question if we are not creating a different reality (or dreamworld) that is all based on knowledge gained through external sources, and in the process forgetting that real knowledge comes through life experience, adventures, and honest relationships. In my experience people have this tendency to find comfort in their achievements based on knowledge gained through hard work, degrees etc. Everyone is familiar with the phrase “life happens” and when it does and hits us hard! But do we wake up from a dream not knowing how to cope? ‘Knowledge’ can only take us so far in life, it is not found in a book, or a dream, or a picture, or on the internet. But in living life, experiencing, surviving, interacting with people, and having a strong sense of who you are.
The picture depicts this dreamlike state (environment) idealistically surrounded by books (symbolizing knowledge) – levitating above human reality, but ironically shows that knowledge is not only found in a resource, but in life experience.
The Gear
– Fujifilm x100 with 23mm f 2.0 lens
– Youngnuo YN560-II Speedlight
– White Umbrella
The Shoot
I rarely create work that involves this much photo manipulation based on concept topics, as I am in fact a documentary photographer. However I do enjoy experimenting with other photographic disciplines from time to time. This project came about through a surrealist brief that I was given whilst I was still studying photography at university.
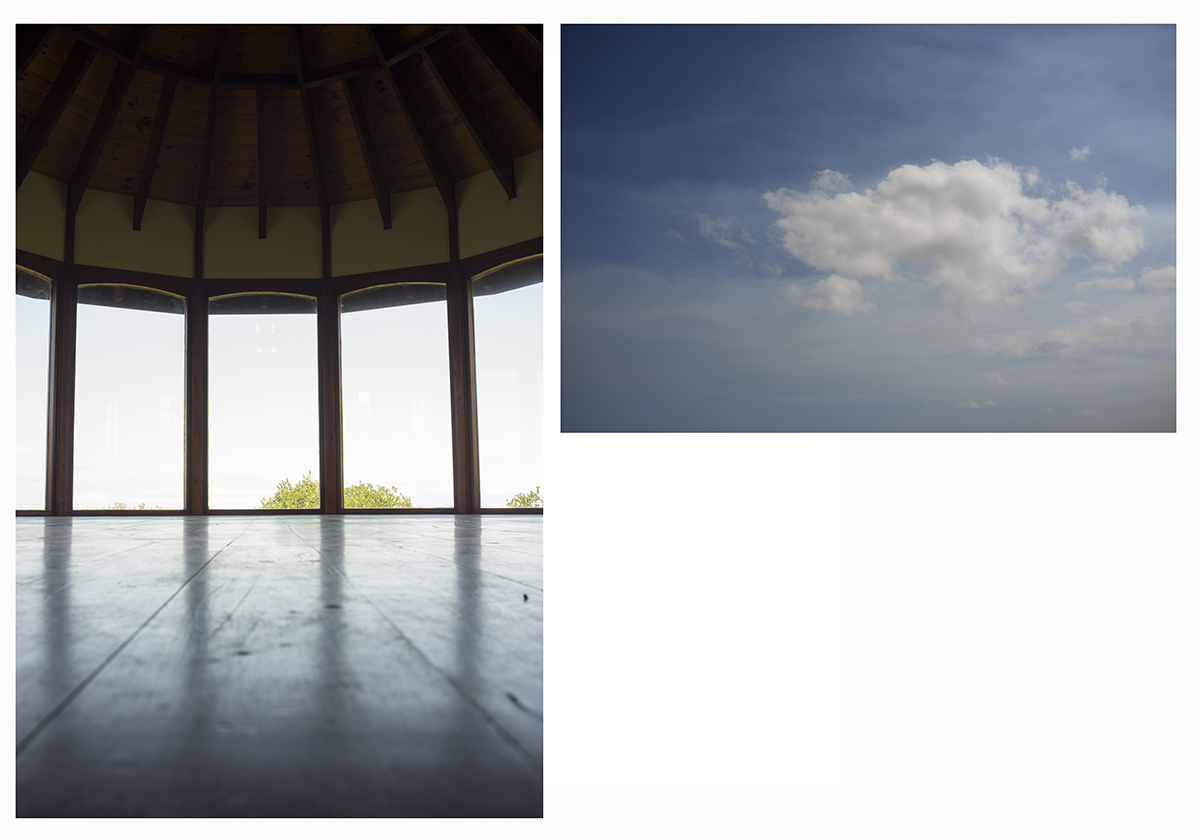
The background plate and sky I used for this composite were shot in a different location from the model and floating books. I had to consider the height and angle of my camera when shooting the various elements for the composite to have a realistic effect. I used my x100 for this shot,without realising at the time that I would have to switch to my Canon for the model shoot as I needed to use my remote trigger for the various composite shots. Whilst matching the lighting from a background can be troublesome, I was lucky as the overcast weather on the day I shot diffused the light entering the location.
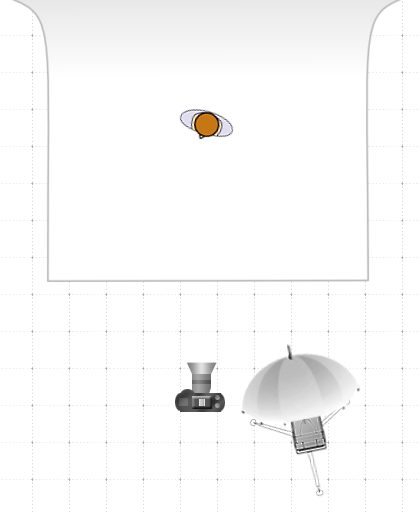
The levitating shot was taken in my garage. Firstly I had to determine the approximate distance from my camera that I should place the model based on my memory of the location. Perhaps in hindsight I should have measured the space to the exact distance. I used a single strobe fired through a white umbrella to fill in the shadows, placed just to the right of camera. Due to the heavily diffused light in the original location I tried to avoid having any distinctly harsh light so that the model would match the environment.
I used a DIY backdrop that I had created for a typography study for the shoot. It ended up being a little narrow to fully cover the model, but this ended up working to my advantage as it created a similar back light to what I had in the background scene. The only issue it caused was some nasty chromatic aberration on the model’s foot, which was easily fixed up in post.
Once I was happy with my setup, the next step was to take the main shot of the model levitating. I took a few shots until I was happy with her body positions and expression. However the trick to creating a believable levitation shot is to make all the hanging parts of the dress and hair also appear to be going against gravity. Using a wireless trigger I shot multiple frames flicking parts of her dress and hair in the air until I was happy with the options I had. It would have been great to have an assistant to help with this shoot, but in the end it wasn’t too difficult.
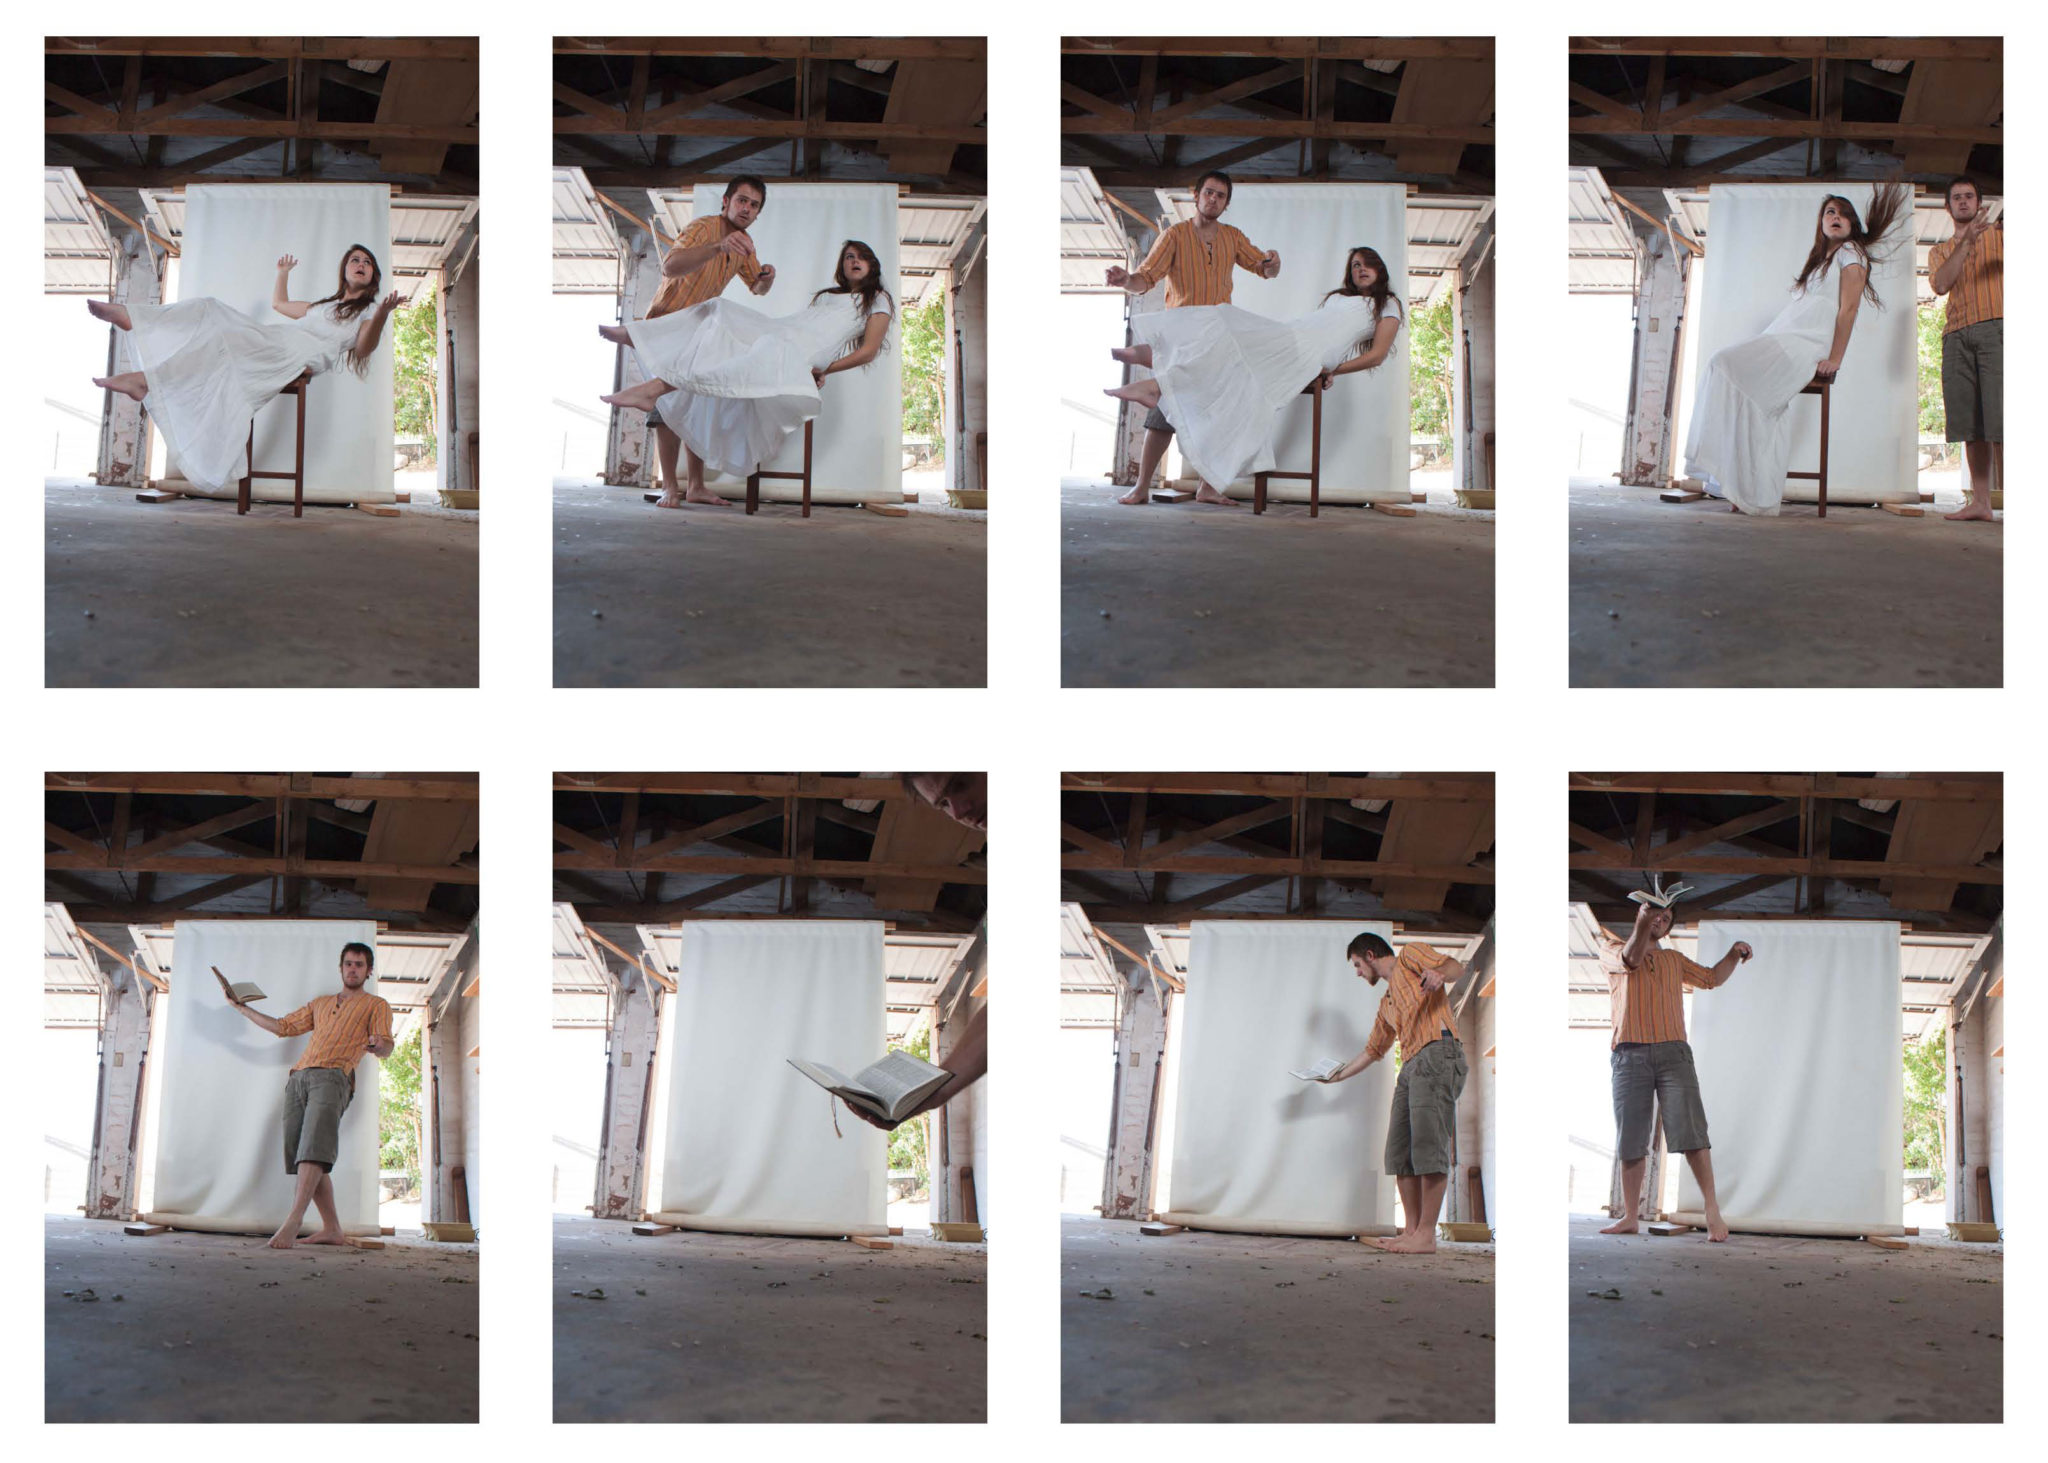
For the final elements for the composite I selected a few old books and photographed them for a variety of different angles, some close to the camera, and some behind where the model would have been. I made sure I had enough shots of the books in different positions so I had a variety of options to choose from to when I made the final composite in post.
Post-Production
Starting in Lightroom I narrowed down the options I had shot in my garage. Starting with the background image, I created a present which I then applied to the rest of the images in order to maintain similar grading and tonalities.
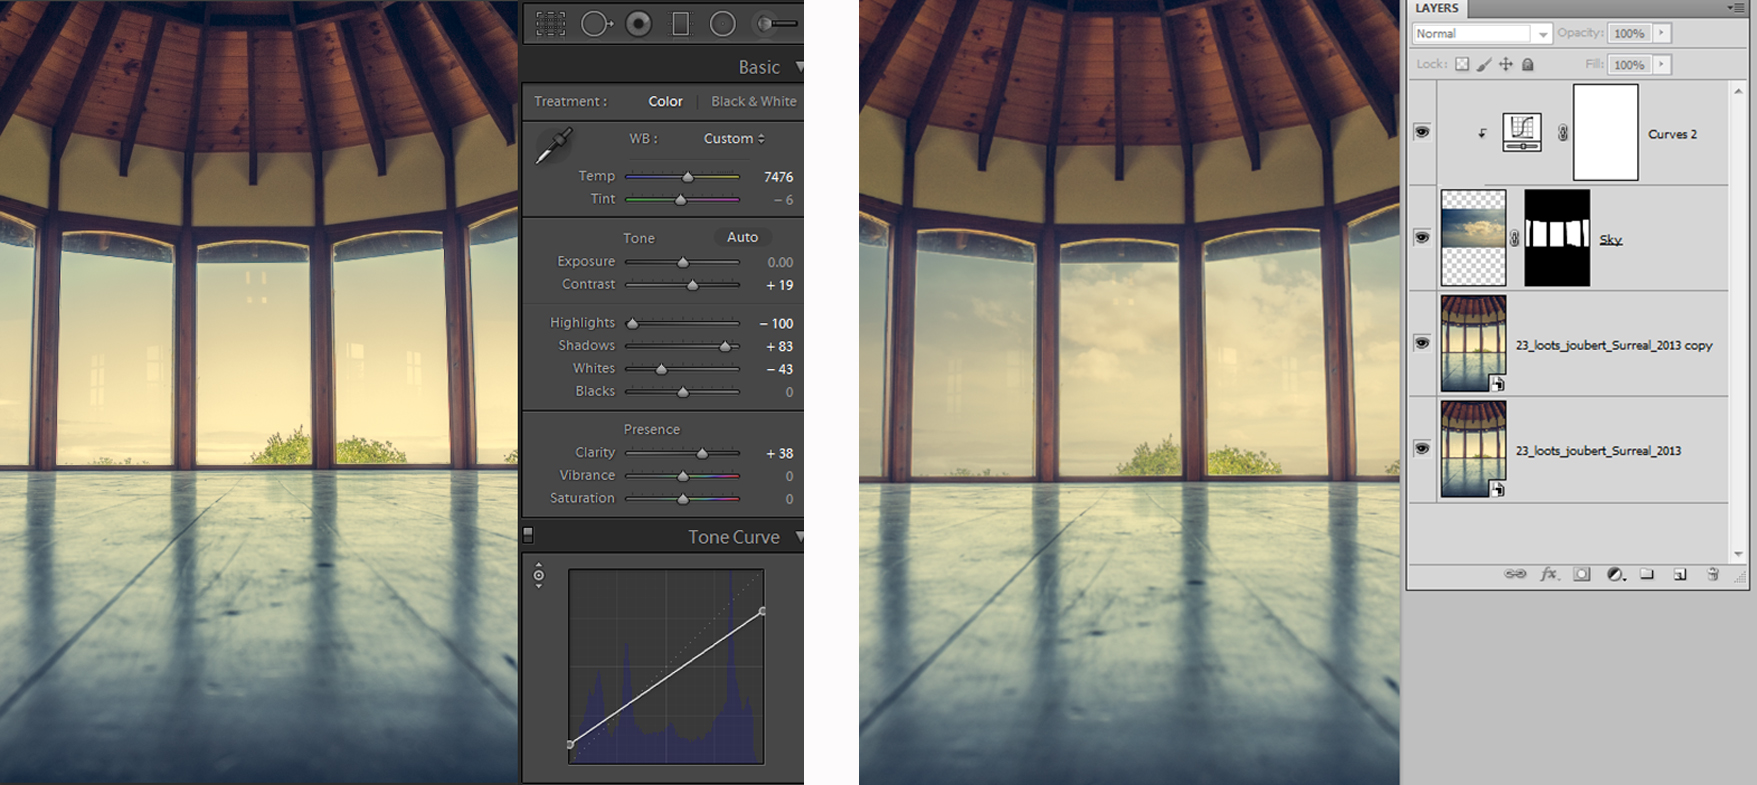
The major adjustments I made for the desired look and feel were the following; I lifted the shadows quite far, brought down my highlights and made a dramatic curve adjustment in the blue channel as shown in the example on the left. These adjustments resulted in the dreamlike look which I had envisioned.
The next step was to start building my image in Photoshop. I started with the background and dropped in the sky. I made a selection in the window area using the quick selection tool to create a mask, which I dragged to the layer above called sky. The dropped in sky was to prominent for my liking so I lowered the opacity to 32%. Although it was tempting to play around with the colour at this point, it was important to not make any colour alterations until the final image was constructed. The dirty floor of the background was distracting, so I used the clone and patch tools to clean up marks on the floor and window areas .
As my DIY backdrop didn’t cover the model, I decided it was best to deep etch the model using the pen tool. I placed this base layer of the levitating model into a group and named it “Model”. From this point I select various options were I had thrown the desk and the model’s hair, using the pen tool to cut them out from their backgrounds. In order to merge these elements seemlessly with the base image, I use the transform tool in warp mode to create a shoot transition between the different elements. Some featured masking finished off the additions.
A similar process was used to place the books within the scene; deep etching with the pen tool, and then tweaking each layer with slight resizing or rotation when necessary. After all the books was inserted, I had to selectively add some Gaussian blur to a few of them in order to create a realistic sense of depth in those closer to the foreground.

Once I was satisfied with the positions of all of the elements , I added some additional colour treatments to help tie the image together. Firstly I created a new black and white adjustment layer, and changed the blending mode to soft light, lowering the opacity to round about 55%.
Next I added a selective colour adjustment, and experimented with adding different colour tones to the midtone channel. It was fun to experiment with pushing the ‘dreamlike’ aesthetic I was going for, but ultimately I ended up reducing the opacity of this layer as I realised I had pushed the grading too far.
To finalize the composite I added a layer of grain to the whole image, which helped soften the sharper details, and made all the separate part blend together as if they were shot on at the location.
Here is the final image.
Get rid of the ads!
Did you enjoy reading this article as much as we enjoyed writing it? There's a way to support us and our reporting, getting ad-free navigation and more as a bonus. Subscribe to us for less than a coffee per month —just $3.99— or take advantage of our yearly subscription with a hefty discount for only $25.- An ad-free experience
- A free mystery box for Lightroom or Capture One
- All the books in our store
- 20% discount on Capture One
- 30% discount on Imalume Photo Theft Protection
- 20% off Herbs and Kettle Tea Company.
- 20% off your order from MPIX printing services.
- 5% off Viltrox Products via their eCommerce store.
- 10% off all film developing, printing and scanning services from Blue Moon Camera and Machine
- 15% off 7Artisans products: The lens and accessory maker is offering a sweet discount for Phoblographer's readers.