Last Updated on 05/20/2014 by Chris Gampat

Creating the Photograph is an original series where we interview photographers about a photo that they shot and how it was achieved. The results are some knowledge passed on to you. Want to be featured? Email chrisgampat[at]thephoblographer[dot]com.
When we ran into the work of Chris Aust on 500px, we were intrigued and wanted to venture further into more of his portfolio. Aust is part of the growing number of photographers that are ditching the DSLR and sticking with mirrorless cameras, their creative vision, and lighting knowledge to create the best photos that he can. The 28 year old Ohio based photographer has shot fashion and portraits with a tendency to usually contrast with urban decay.
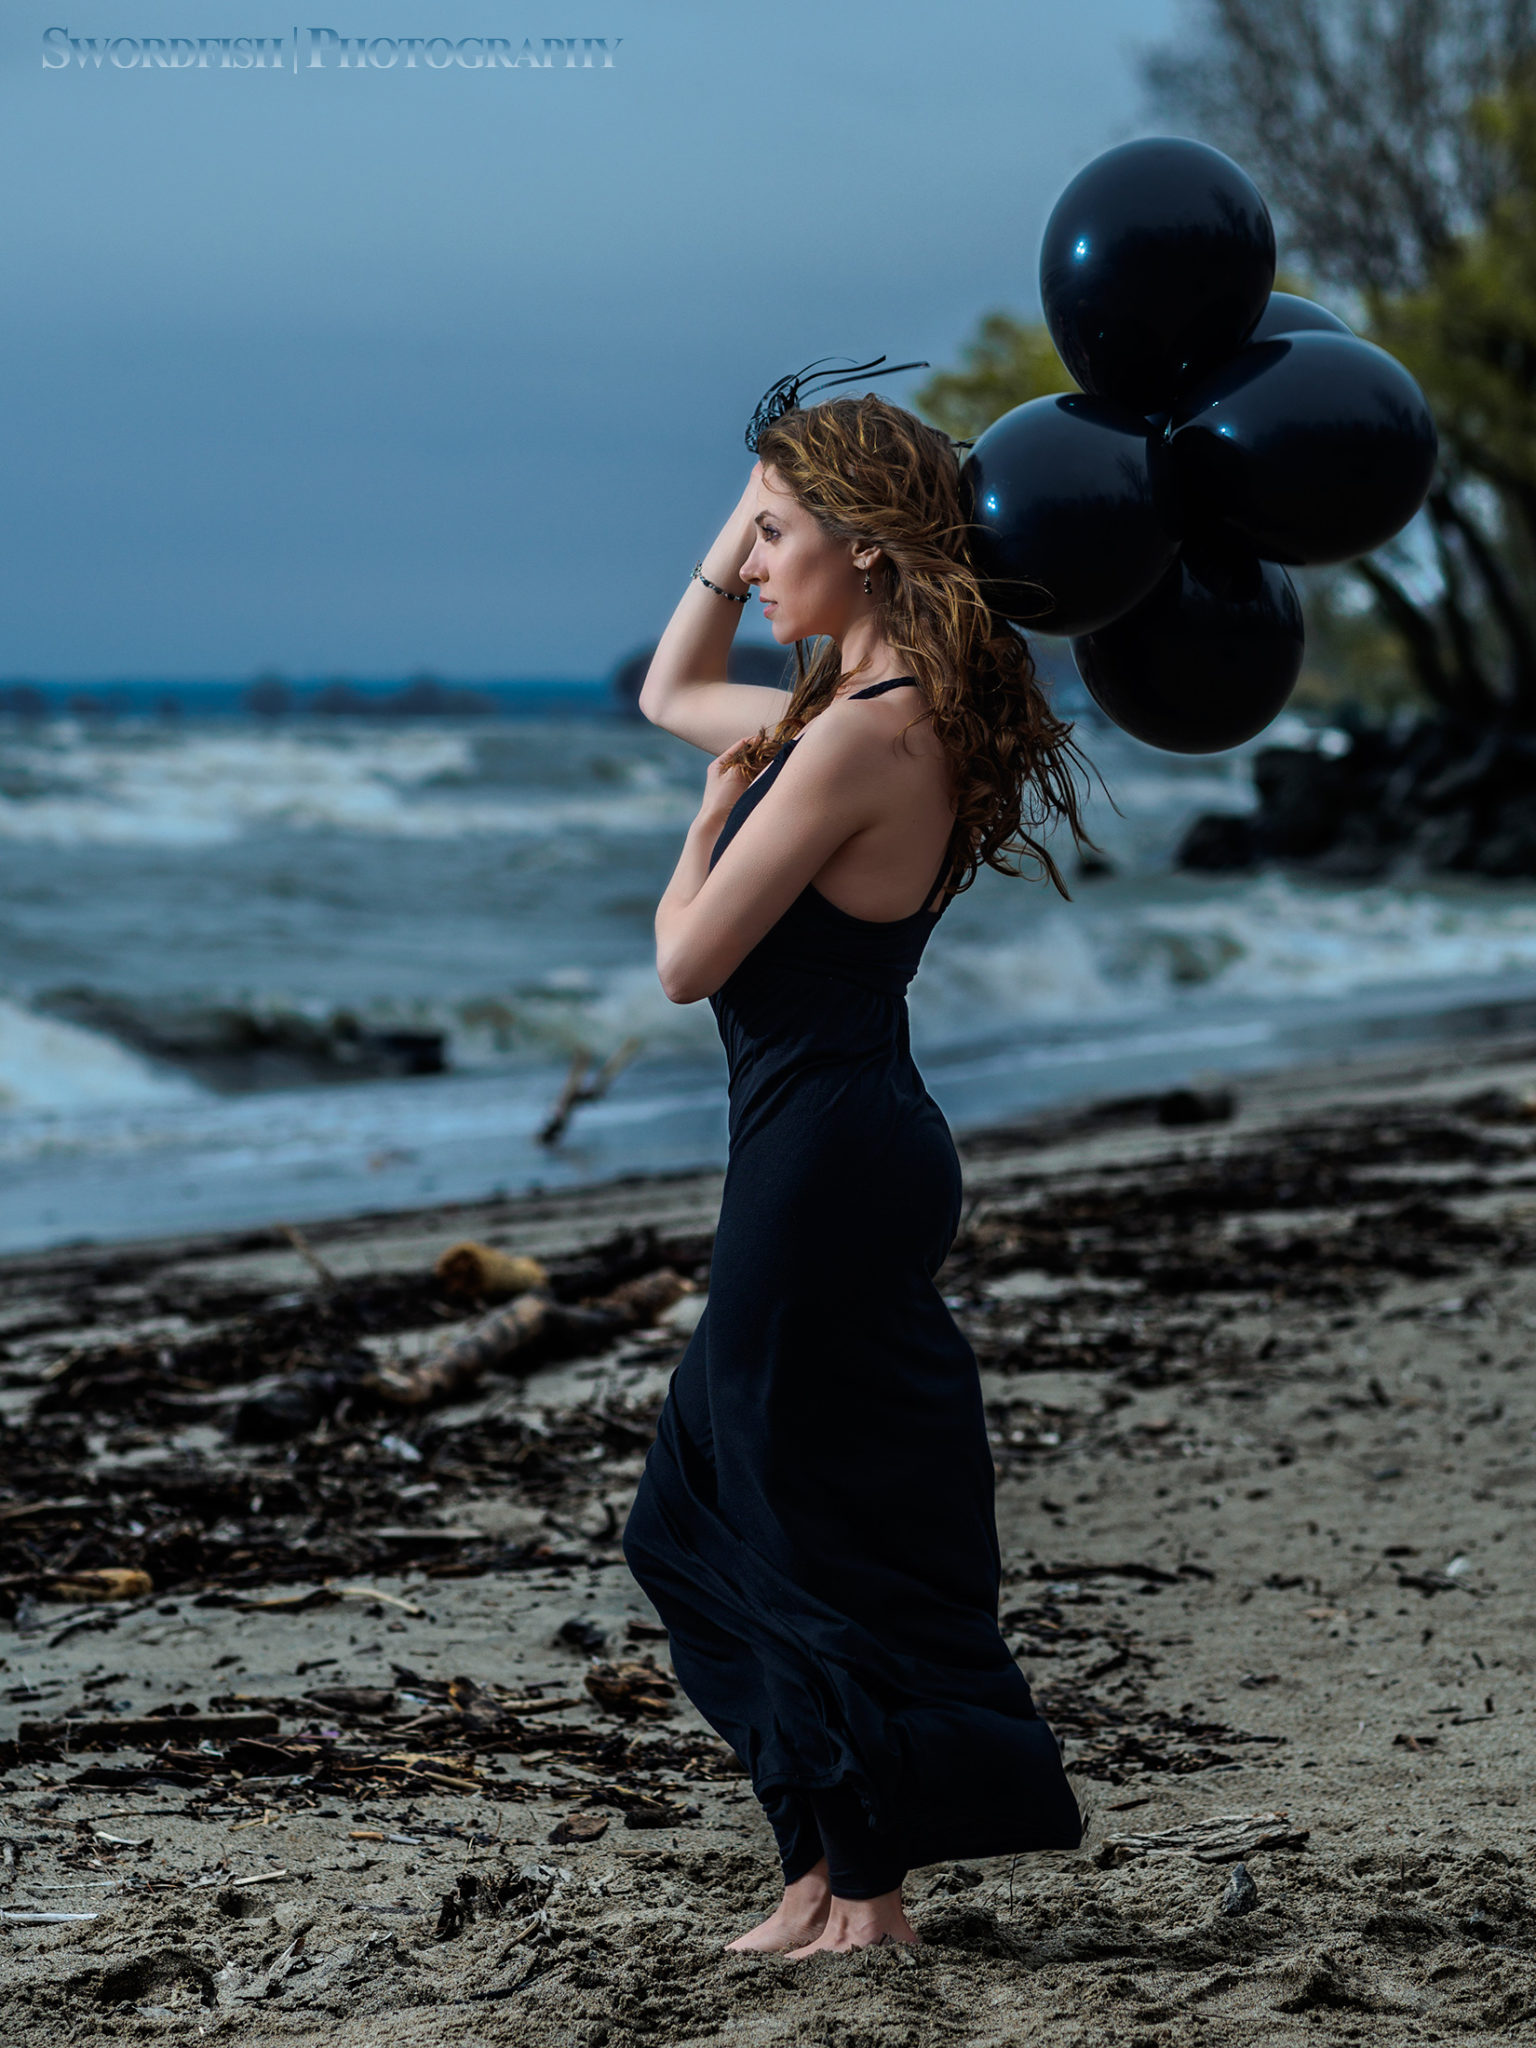
His Stormy Beach photo and the story behind it is a lesson in blending natural light with flash for all those that really wish to become a better strobist.
Here’s his story.
The Concept
This portrait started off as a final portfolio piece in my 2nd year photography class. It was supposed to be a simple studio portrait using the constant lighting system, but I thought that my portfolio would benefit more from a creative shot. I wanted something riskier that I could be proud to present. I spoke with my professor, and he gave me the go ahead to do what I wanted. So outside I went!
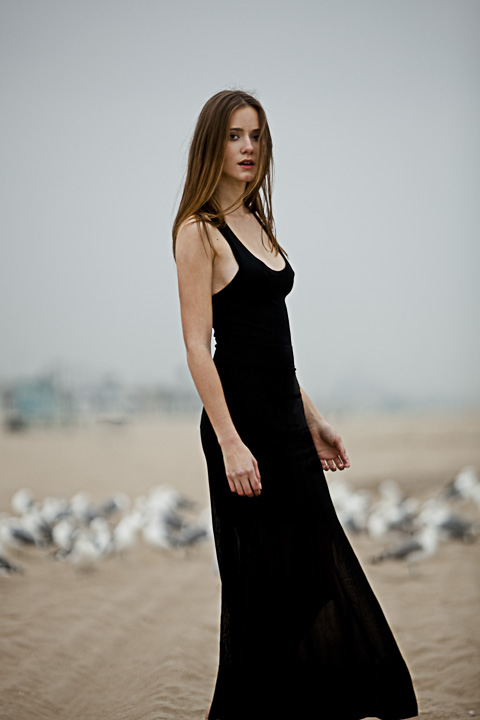
I’m always trying to improve my photography. A few times a week, I hop on 500px.com, modelmayhem, and Flickr to search for inspiration and click the “like” button on photos I like. I’ve only been doing photography for just over a year, so I’m still new to it. One way I push my photography forward is I analyze amazing photos and then pull aspects and attempt to duplicate them, which is what I did for this picture. My inspiration was originally from a photo by Joe Diez/JFD Photography.
Unfortunately/Fortunately the day was much stormier than I had anticipated, and there weren’t any seagulls. We stopped for food to regroup. I don’t normally recommend stuffing your model with pizza before taking her picture, but with our newly found food euphoria and a box of bread sticks (to tempt any birds that might be around) we decided to make it work. My model Tiffany was looking really good that day, which isn’t surprising since she is actually a licensed cosmetologist. I didn’t want to lose the opportunity for some beautiful shots.
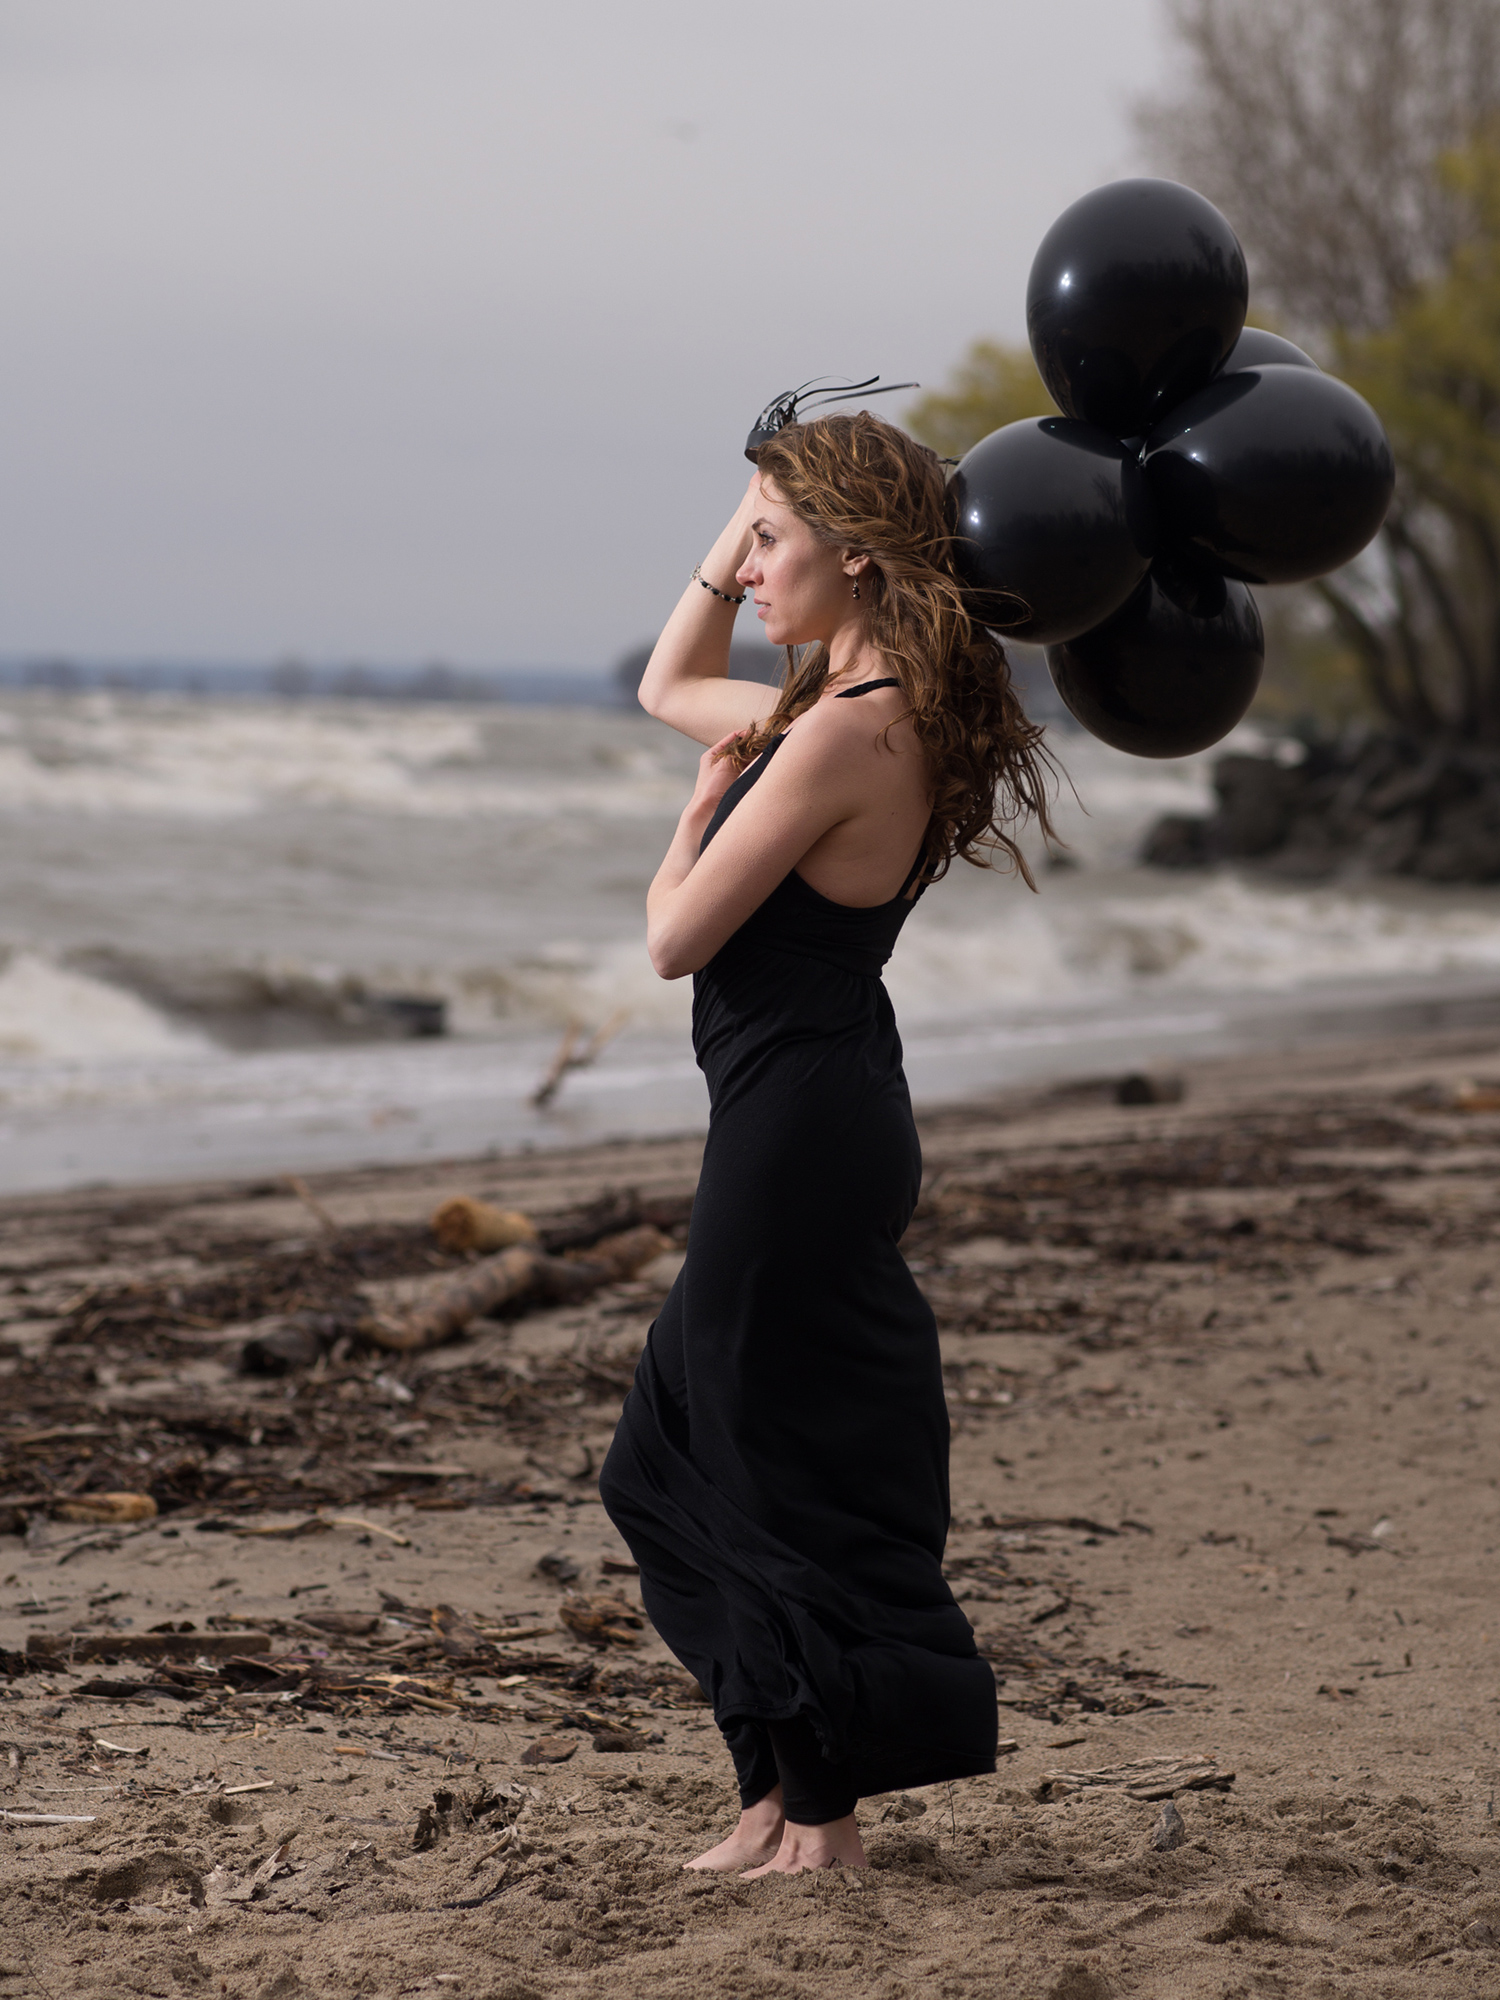
I decided to pick up some black balloons to use in the shoot. I’m a fan of props as standing around looks great, but standing around with a prop adds another dimension. I thought black balloons would look awesome complimenting her black dress and the storm.
The Gear
- Olympus OMD EM-5 camera
- Olympus m.Zuiko 75mm f/1.8 lens
- Lumopro 7’ Compact Light Stand
- Lumopro LP180 Quad Sync Manual Flash x3
- Chetah Tri-Speed H120
- Cactus V5 radio transceivers x2
The Shoot
It was almost a mile trek out to the beach, which was located at the very end of a wetland preserve. Before we got to the beach, we stopped and I affixed lenses to my cameras so I wouldn’t need to do it with sand blowing all over the precious sensors. I started with the Olympus EM-5 and the Olympus m.Zuiko 12-40mm f/2.8 Pro, which hopefully would give me enough wiggle room for wide and tight shots. Plus the entire system is weather-sealed so if it ended up raining I would be safe. The 12-40 on Micro Four Thirds is 24-80mm equivalent on full frame. Unfortunately the smaller sensor size, which is awesome for turning normal lenses into telephoto, doesn’t allow for very shallow depth of field. To compensate for this, I took out my Canon 5D Mark II with EF 85mm f/1.8 lens for a little extra reach but very thin DOF.
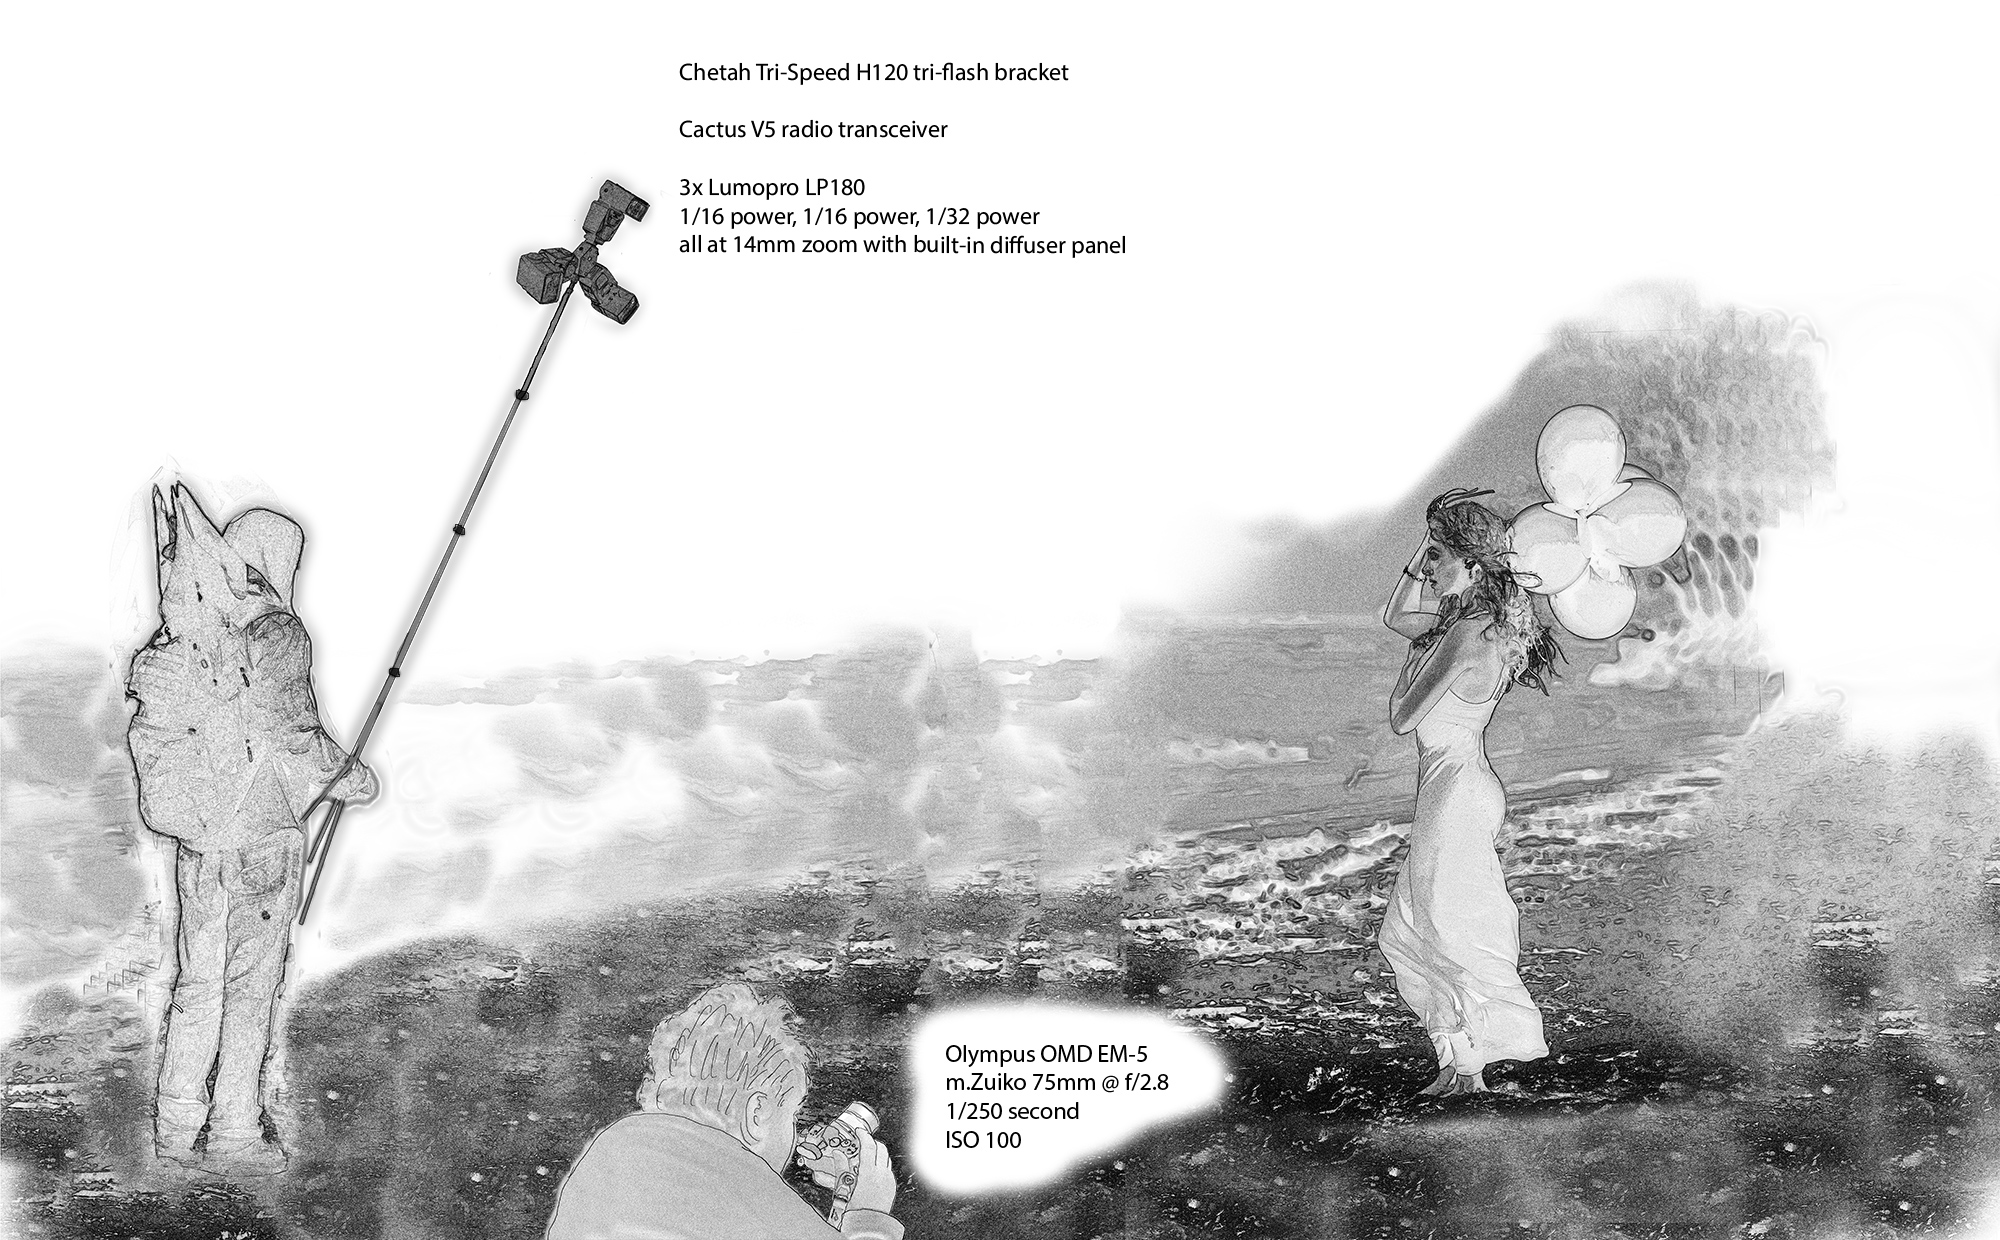
Cameras out, we trekked onto the beach. The sky was overcast, which made for very flat (albeit even) light. Not very dramatic or pretty, but at least it wasn’t harsh sunlight. To compensate and to add a little depth, I decided to use strobes boomed above and in front of my subject. On a Lumopro 7” compact light stand, I attached a Chetah TS-H120 triflash bracket. This little thing is amazing (and cheap), and really saved me a lot of time since I only need one radio transmitter for up to 3 flashes attached to the bracket.
Foolishly, with the strong winds, I attempted to open my 50” Westcott Apollo softbox. Immediately I closed it back up and put a couple logs on it to keep it from blowing away. Not gonna happen. So the only thing to do was to work with bare strobes. For this I used 3 LumoPro LP180s, which are my go-to for off-camera flash. They’re so rugged and durable, and the guys at LumoPro are a big help when I’ve needed them. Plus the flashes have a 2 year warranty, and I’ve made use of it once so far.
So with shooting bare, the light source is much smaller than with using a modifier like a softbox or umbrella, and with the small light source comes a harsh light with sharp light falloff and hard shadows. I didn’t want this, so I put all 3 of my strobes on the bracket and popped out the built-in diffusers on the strobes. One of the strobes I slightly angled away from the other two, to give me an even greater spread of light. The bigger the light source, the softer (and in my opinion, the more attractive) the light becomes. I plugged in a Cactus V5 transceiver to the tri-flash bracket with a 3.5mm cable, and attached two more Cacti (Cactuses?) to each of my cameras I would be using.
Because it was still fairly bright outside, I wasn’t sure if using the flashes under slave mode with the optical triggers would work as well, plus that also required me to use a flash attached to the camera to act as a commander-flash. That might spill extra light onto the subject, and I’m spoiled using these fairly cheap but reliable radio triggers, so why not!
Unfortunately, both of my cameras have rather slow flash sync speeds (1/200th for the Canon and 1/250th for the Olympus), so I couldn’t use as shallow of depth of field as I would have liked. Even though I was lugging around my giant Pelican case full of camera gear, plus a backpack full of lighting gear,I left all my ND filters at home.
We did some exposure testing and decided that 2 flashes set at 1/32nd and 1 flash set at 1/16th -0.6 EV gave us correct exposure shooting bottomed out at 1/200th of a second , ISO 100, at f/5.6 on the Canon. If we moved the light a few feet farther away, we could shoot with the Olympus bottomed out at 1/250th of a second, ISO 100, but at f/2.8, which would give us the same DOF as the Canon full frame, and shallow DOF was what I was after! Sadly, f/2.8 is 4 times as bright as f/5.6, so our light had to be almost twice as far away… I think. Not sure on the math for the inverse square law. Any mathematicians out there?
An additional benefit, to using multiple flashes instead of only one, would be the less power I needed to use per flash. If I used 1 flash and I needed to use it at full power to get the desired exposure, I would only need to set two flashes at ½ power to get the same results. 3 flashes at 1/3 power each, etc. Lower power means faster cycle times, which means less waiting in between shots. Since the wind was blowing so much, and her hair, the balloons, and the dress were all doing their own thing, I wanted to take lots of pictures to make sure I got one that had all three elements exactly where I wanted them.
After taking some shots with the Canon, I decided to switch to the Olympus for the remainder of the shoot. The Canon would sit on the beach on a tripod and take shots remotely every time I pressed the shutter button on my Olympus, thanks to the transceiver ability of my Cactus V5s. I took a couple test shots and it worked, but it never took any other pictures after that. I’m not sure what happened. The cord might have come loose. So sadly no “while-we’re-shooting” behind the scenes shots. Next time I’ll be more prepared!
Unfortunately the 12-40mm zoom wasn’t giving me the look I wanted, so brazenly I switched lenses on the beach, keeping the camera down and my back to the wind. I replaced the handy 12-40 with the venerable Olympus m.Zuiko 75mm f/1.8, which is arguably the sharpest lens in the Micro Four Thirds lineup. I seriously love this thing, but it’s 150mm equivalent focal length makes it kind of tough to work with. However, with that 150mm equivalent focal length comes with it a shallower depth of field than shorter lenses. It comes in handy a lot for portraits. That day was no different, but I really needed some walkie-talkies. Because of how far away I was from the model and how windy it was, I was shouting but my voice wasn’t carrying as far. But with that North-East wind, we got some awesome waves.
So with the 75 attached, and the balloons up, we snapped some pictures. Her dress was a bit too flowy in the wrong places so we clipped it to keep it formfitting and show off her curves. The lights were put up, and I positioned him about 12-15 feet away, with the lights extended up and pointed down at her. I hoped this would give us enough light spread over an area to cover all of her, and it worked out quite well. The balloons by this time had tangled themselves together because of the wind, so if you want balloons that are separated and whose strings aren’t all one big mess, keep them very far apart and tied down a few feet from each other until you’re ready to shoot.
I positioned Tiffany facing the water so her hair would blow away from her face, and the balloons would follow suit. It did end up doing strange things to the dress because it wasn’t tight in the areas that I wanted, but I fixed some of that in post-production. We took some shots far away from the water but I didn’t like how all of the washed up driftwood was in the picture, so we ended up moving closer to the water. Bad idea! While we moved up, the waves had momentarily died down and we took up position right where they were washing ashore a few moments earlier. Everything started out fine, but Tiffany kept laughing and I couldn’t figure out why. Then I saw it in my viewfinder. A wave suddenly washed over her feet! I took a few more photos before I realized why she was laughing. I looked over to my left where the lake was, and Cody, who was holding the lights, was soaked up to his knees! Thankfully he was a trooper and didn’t move or drop the lights! I yelled out a quick apology and took one more photo and then we headed back away from the water so they could try to dry off. From there it was home to edit the photos and pick a couple good ones for class.
Post-Production
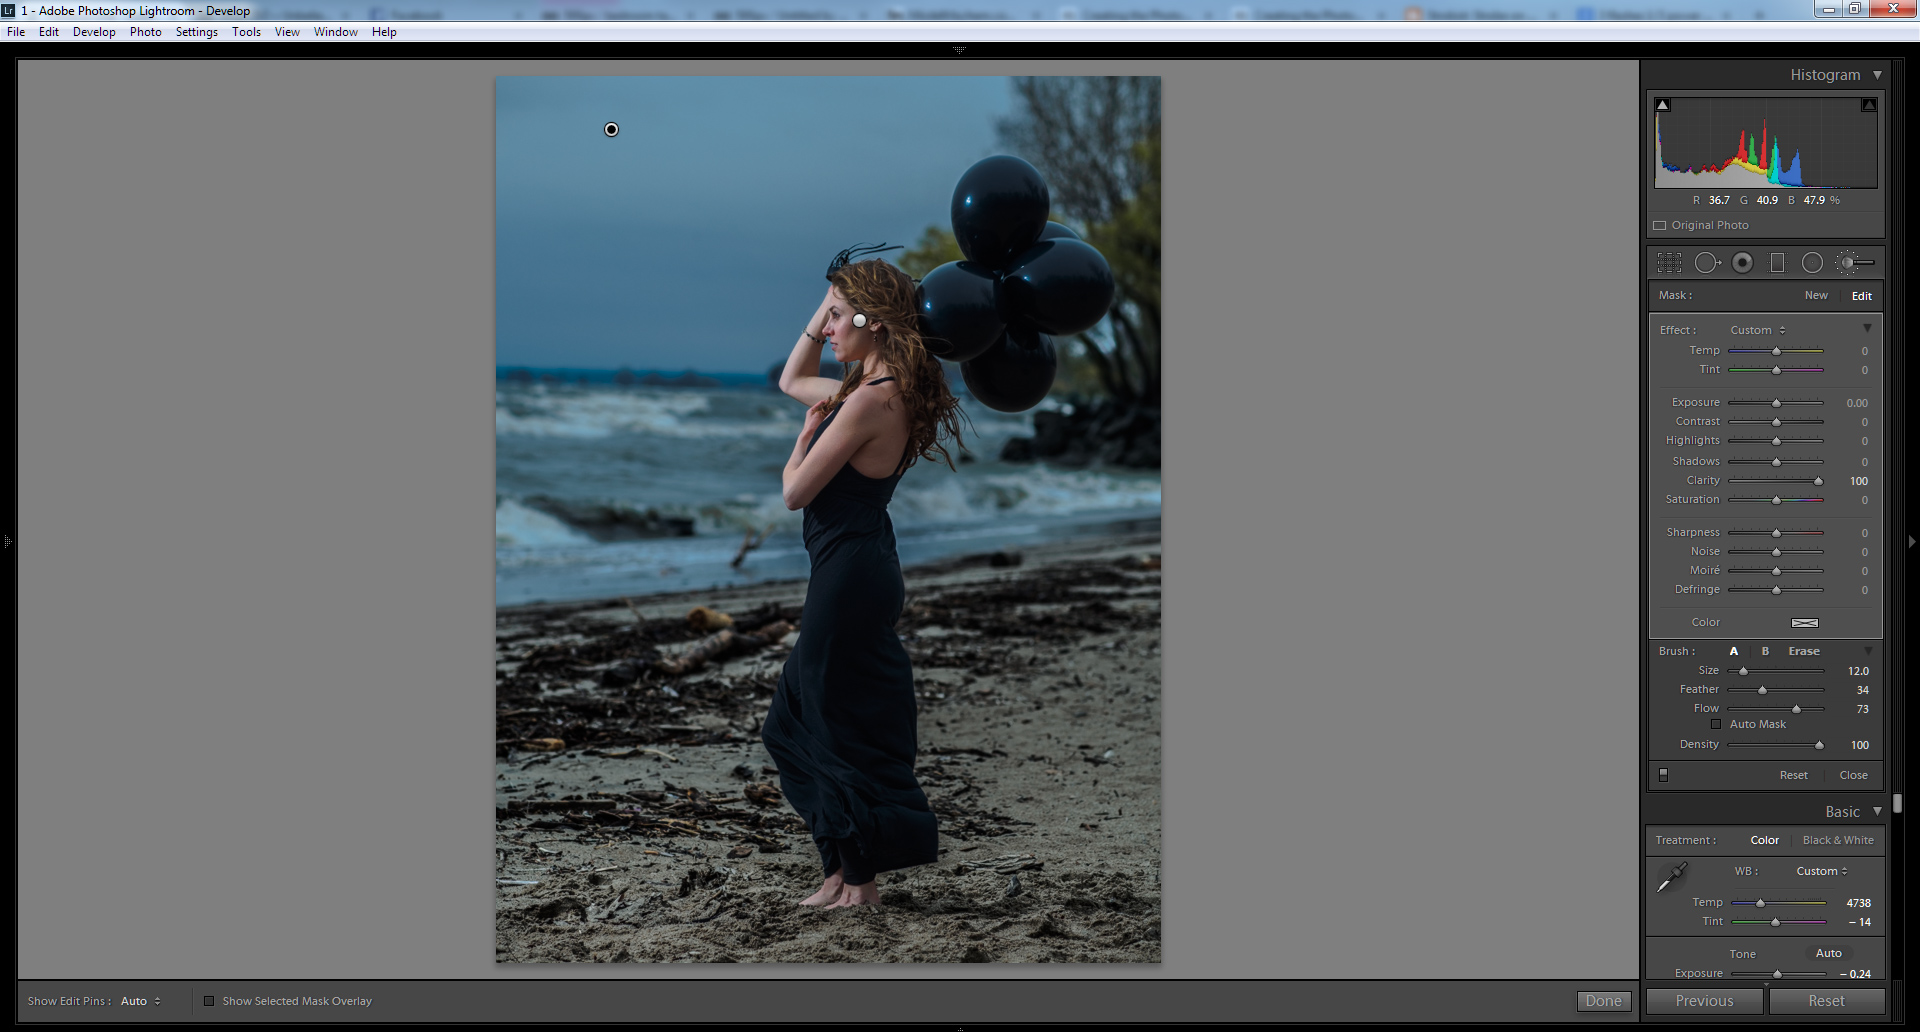
Post-production was actually quite simple. Initially I imported all the images into Lightroom for easy viewing and rating so I could cull the bad ones and apply camera corrections. I almost always start out with a Huelight camera calibration profile to get the colors looking amazing and so I can bump up the vibrancy without things looking unnatural like when using the Adobe colorspace. From there, I cooled down the white balance to bring out the blues in the sky and water. Sadly Lake Erie is rather shallow and at best our water is green, at worst it is brown. I sharpened and warmed up Tiffany with an adjustment brush, and did a 100% clarity around the background to really make it pop.
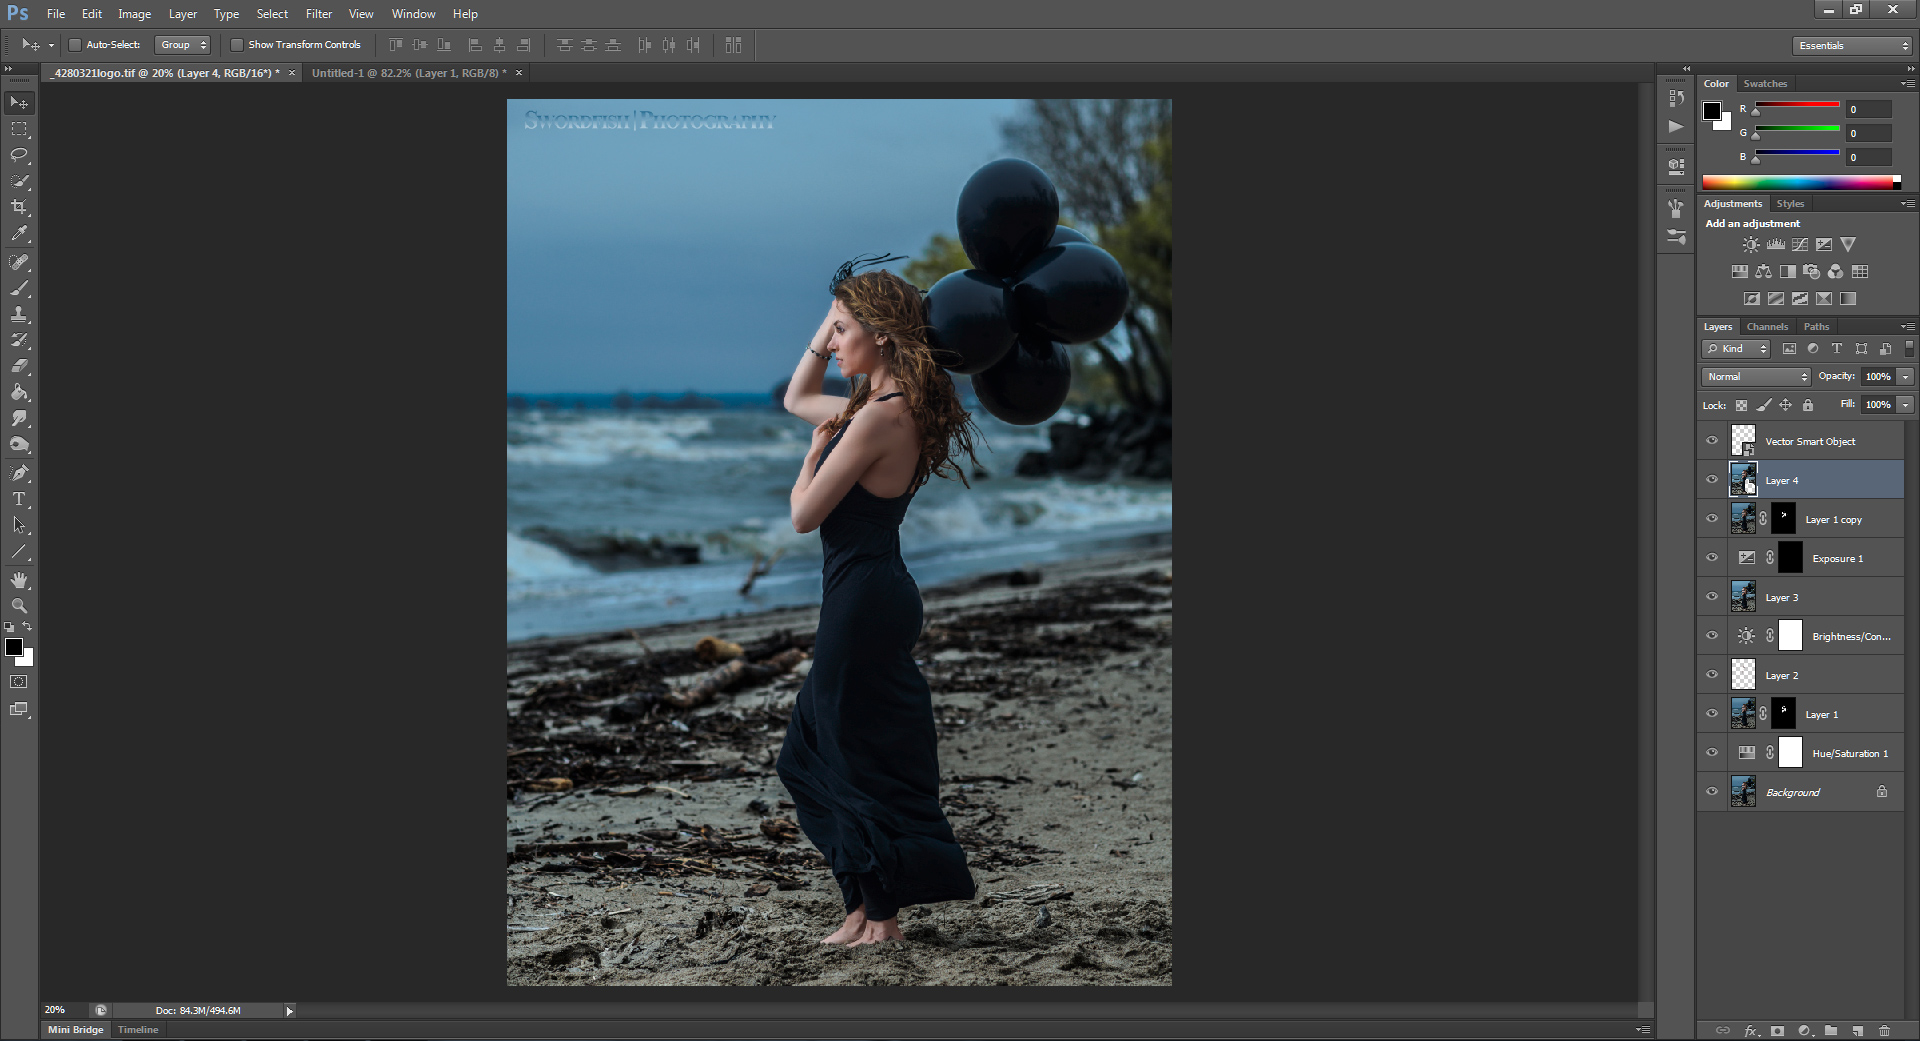
After the initial processing was done, I brought it into Photoshop for the heavy lifting. First up was to remove the redness from her face using a hue/saturation technique I picked up from Phlearn. Really awesome stuff, especially when you’re out in the cold and the wind for even a little bit of time. After that I used motion blur to soften her skin and make the goose bumps less pronounced, which really speaks volumes about the 75mm and how sharp it is. After that I made a new layer and used an existing skin tone to try and bring some color to some of the highlights on her arms that were a bit too pale from the long winter. After that, I cloned out the reflection of the flash visible on the balloons and adjusted Tiffany’s waistline with a bit of Liquify. She really is a tiny little thing, but the wind was playing hell with the dress and making it look like she was all sorts of shapes that she really wasn’t, so it needed some help to look more accurate. After that, I did a brightness adjustment and put a small exposure compensation on her eyes to brighten the sclera, which you really can’t see since it’s so small, but the devil is in the details! I also clone-stamped out the roll of electrical tape that was acting as a very ineffective weight used to keep the balloons from floating away. From there came the watermark, and away she went!
Before/After
For more, please follow us on Facebook, Google+, Flickr and Twitter.
Get rid of the ads!
Did you enjoy reading this article as much as we enjoyed writing it? There's a way to support us and our reporting, getting ad-free navigation and more as a bonus. Subscribe to us for less than a coffee per month —just $3.99— or take advantage of our yearly subscription with a hefty discount for only $25.- An ad-free experience
- A free mystery box for Lightroom or Capture One
- All the books in our store
- 20% discount on Capture One
- 30% discount on Imalume Photo Theft Protection
- 20% off Herbs and Kettle Tea Company.
- 20% off your order from MPIX printing services.
- 5% off Viltrox Products via their eCommerce store.
- 10% off all film developing, printing and scanning services from Blue Moon Camera and Machine
- 15% off 7Artisans products: The lens and accessory maker is offering a sweet discount for Phoblographer's readers.