Creating the Photograph is an original series where we interview photographers about a photo that they shot and how it was achieved. The results are some knowledge passed on to you. Want to be featured? Email chrisgampat[at]thephoblographer[dot]com
Sarah Micaela Snape is a photographer that hails from Boston, MA, and she does a ton of portraits. Her work is clean, fresh, and is one of the more interesting collections that you’d find right now in the contemporary space. But we were enthralled by a simple image. Upon finding this image by her on 500px, then looking at her Facebook and Twitter, we knew that Sarah had something to offer us for the Creating the Photograph series.
Though this portrait is very simple, many experienced strobists know that a lot of work can go into getting something like this.
And here’s her story.
The Concept
Singer-songwriter Scott Mahoney got in touch with me to create some new press & promo images for his upcoming album release. He wasn’t sure exactly what he wanted as he didn’t have a specific vision for the images. What he did know was that he wanted a new set of images that are “different” (his words) from his current promo images, which are very bright, colorful, outdoorsy, lifestyle-type images. He wanted something a bit more “edgy” (his words) to add variety to his press kit. So I knew I’d take this shoot in the opposite direction. We’d do the shoot indoors (which was perfect, because January in Boston = COLD!) and everything would be lit, but not too lit.
Next, we needed to find a suitable location. All my work is location work because I don’t have a studio. Finding the right location for each shoot can sometimes be a challenge. Many times, the locations can be less than desirable. I’ve learned to adapt. For this shoot, however, I had the idea of using a fantastic little dive bar that I sometimes frequent. I’m friendly with the owner and felt confident that he’d give us permission to do the shoot in his bar…and he did! (Thanks, Paul!) I told Scott about my location idea and he was on board. The dive bar is very atmospheric. With the right lighting, I knew we could achieve the look I thought Scott was going for.
Speaking of what I though Scott was going for, I needed to hit the right balance of “different and edgy” for Scott. His music is pop, and very sort of bouncy and light, youthful. I knew that what he meant by “edgy” is not necessarily what I would define as edgy. And I confirmed this throughout the shoot by asking him about music in general – what he listens to, what he doesn’t listen to – and I asked him to describe his music for me just in case his new album is actually taking a darker turn and is different than the songs I’d heard on his Soundcloud page. I wanted to make sure the images I created would represent him and his music accurately.
I’m happy to report that both myself and my client are very pleased with the final images. Happy client! Job done.
The Gear
The gear for the entire shoot:
Canon 5DM
Canon 24mm 1.4L, 50mm 1.4, 135mm 2L lenses
(2) Canon 580 EXII Speedlites
(1) Paul C. Buff Einstein Light & Battery
(1) Paul C. Buff 47″ Octobox
(1) Lastolite 46″ Ezybox Softbox with grid
(1) 60″ Shoot Through Umbrella
(3) Light Stands
(1) Savage Collapsible/Reversibly Background in “Monsoon” Color
(1) Impact 5-in-1 Collapsible Oval Reflector 42×72″
Pocket Wizards
Gaffer Tape
Ladder
The gear used for the particular shot in question:
Canon 5DM2
24mm 1.4L lens
(1) 580 EXII Speedlite in the 47″ Lastolite Soft Box with Grid
(1) 580 EXII Speedite in the 60″ Shoot Through Umbrella
(2) Light Stands
Ladder
The Shoot
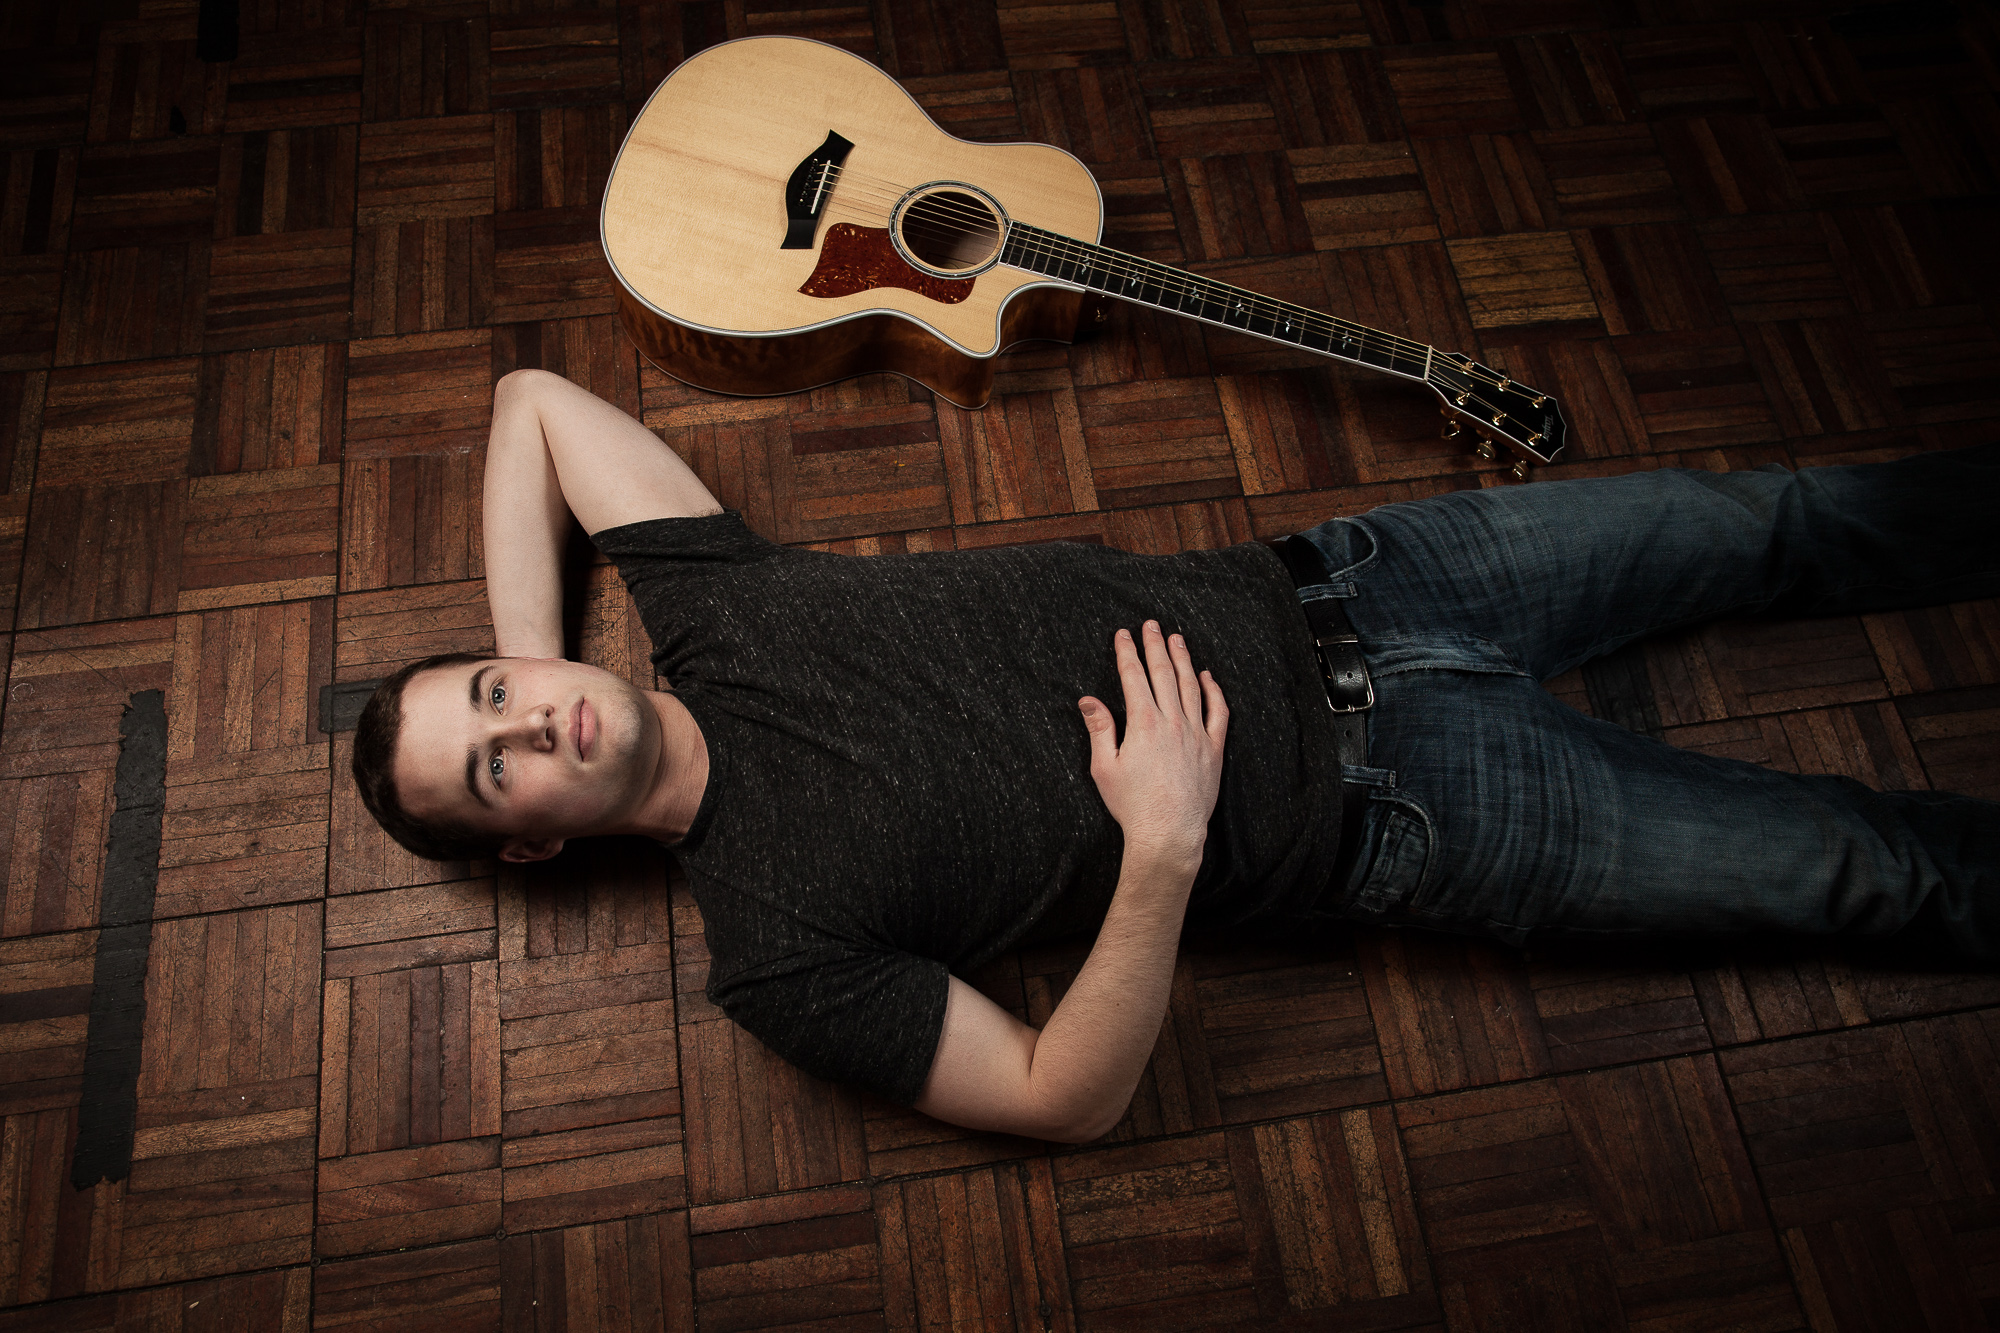
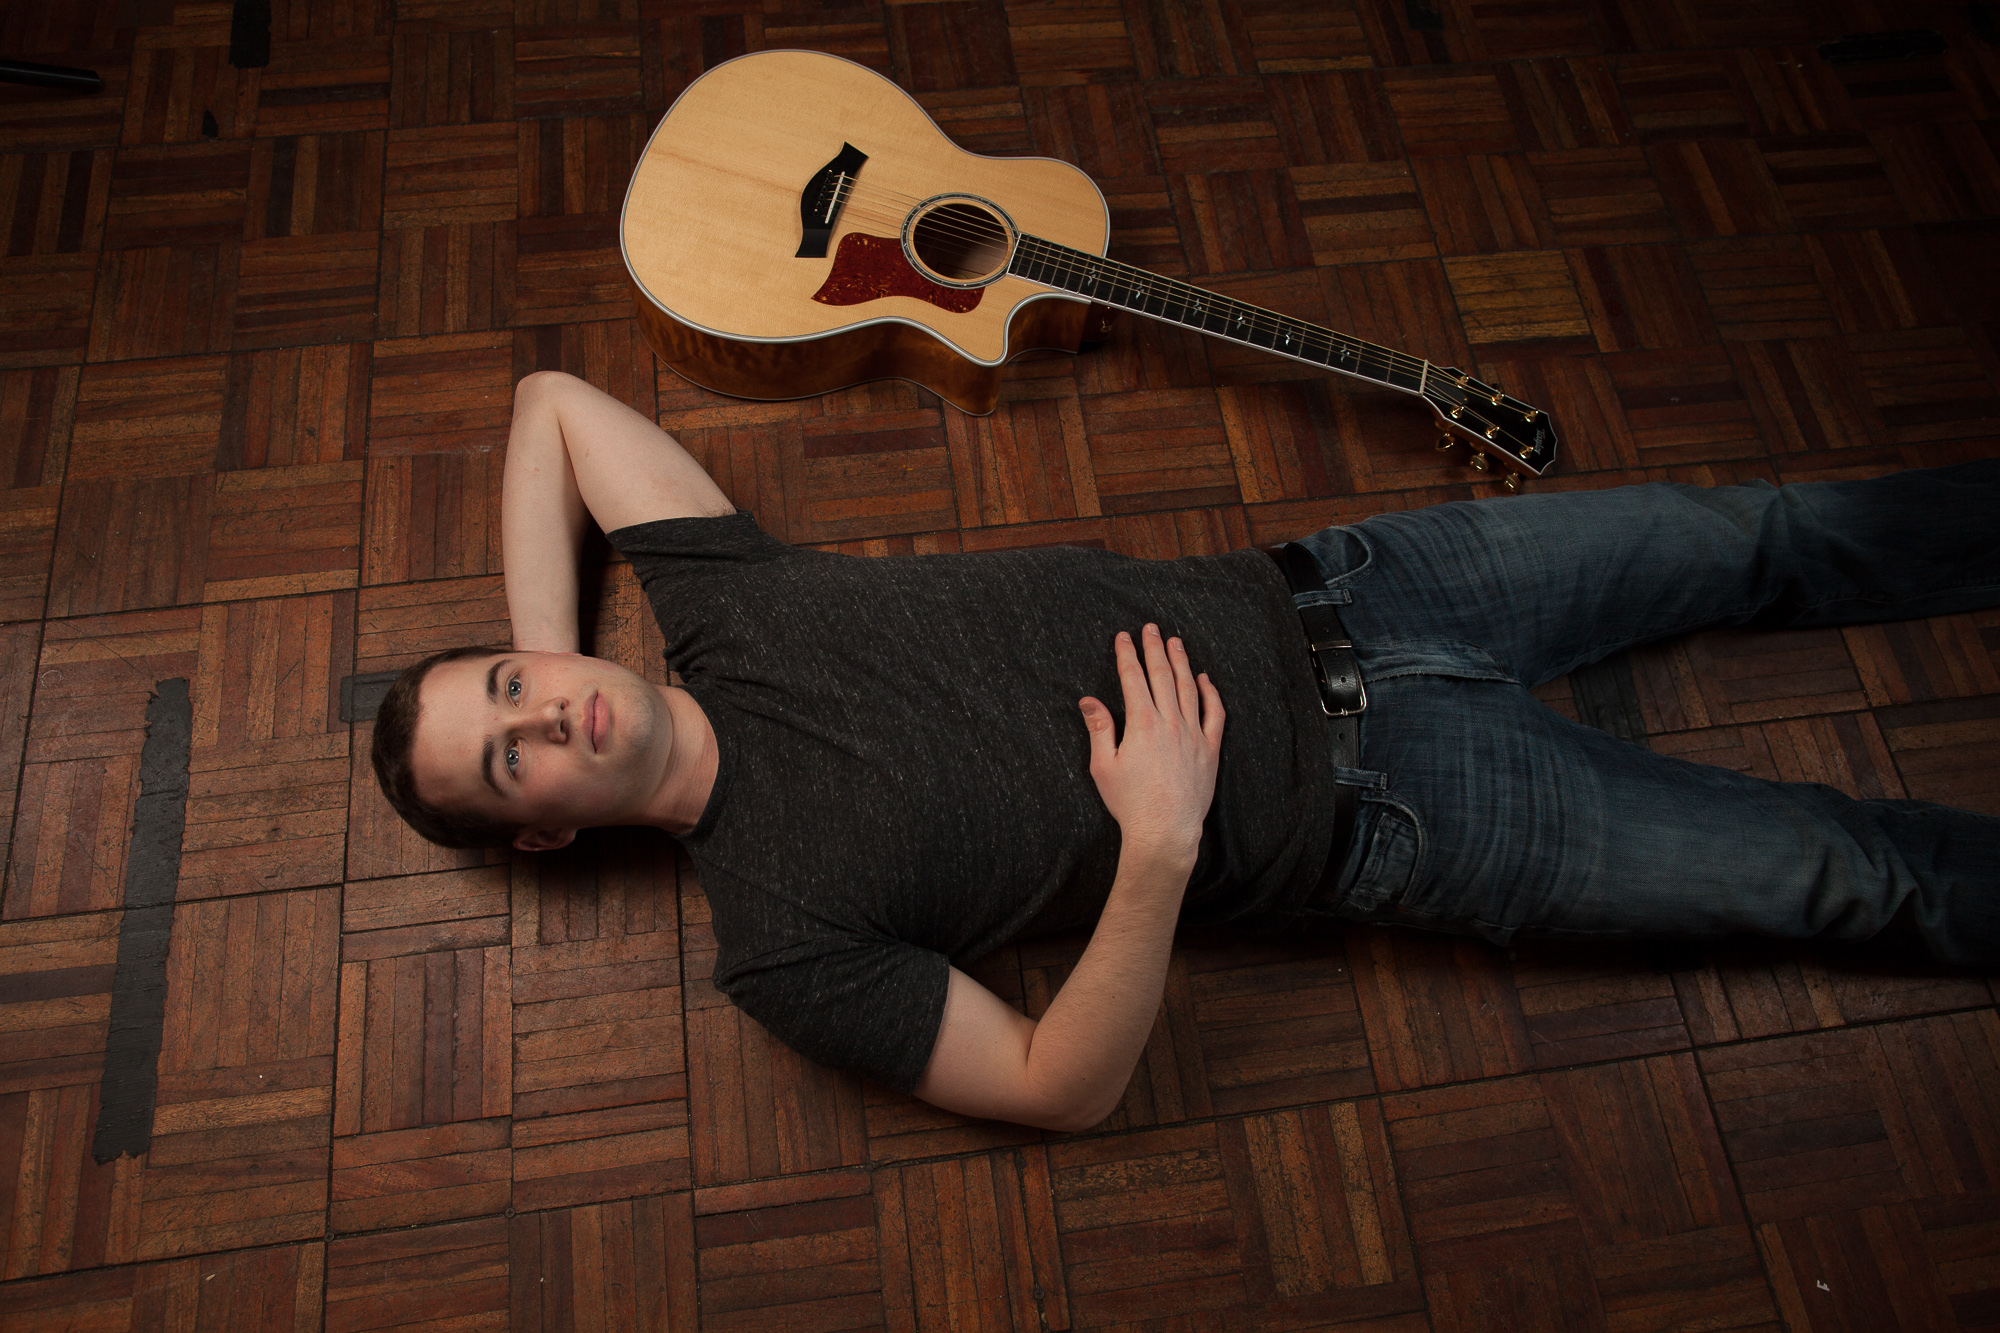
This particular shot was the fourth lighting setup out of the five we did that day. The shoot took place in a separate room in the back of the bar. This room is used for private parties and events, and as such, it has a little dance floor. My plan was to work our way around the room, getting a nice variety of lighting scenarios and poses. I had a shot list in my head, so I already knew I wanted one shot of Scott lying down on the floor with his guitar and me shooting him from above on a ladder.
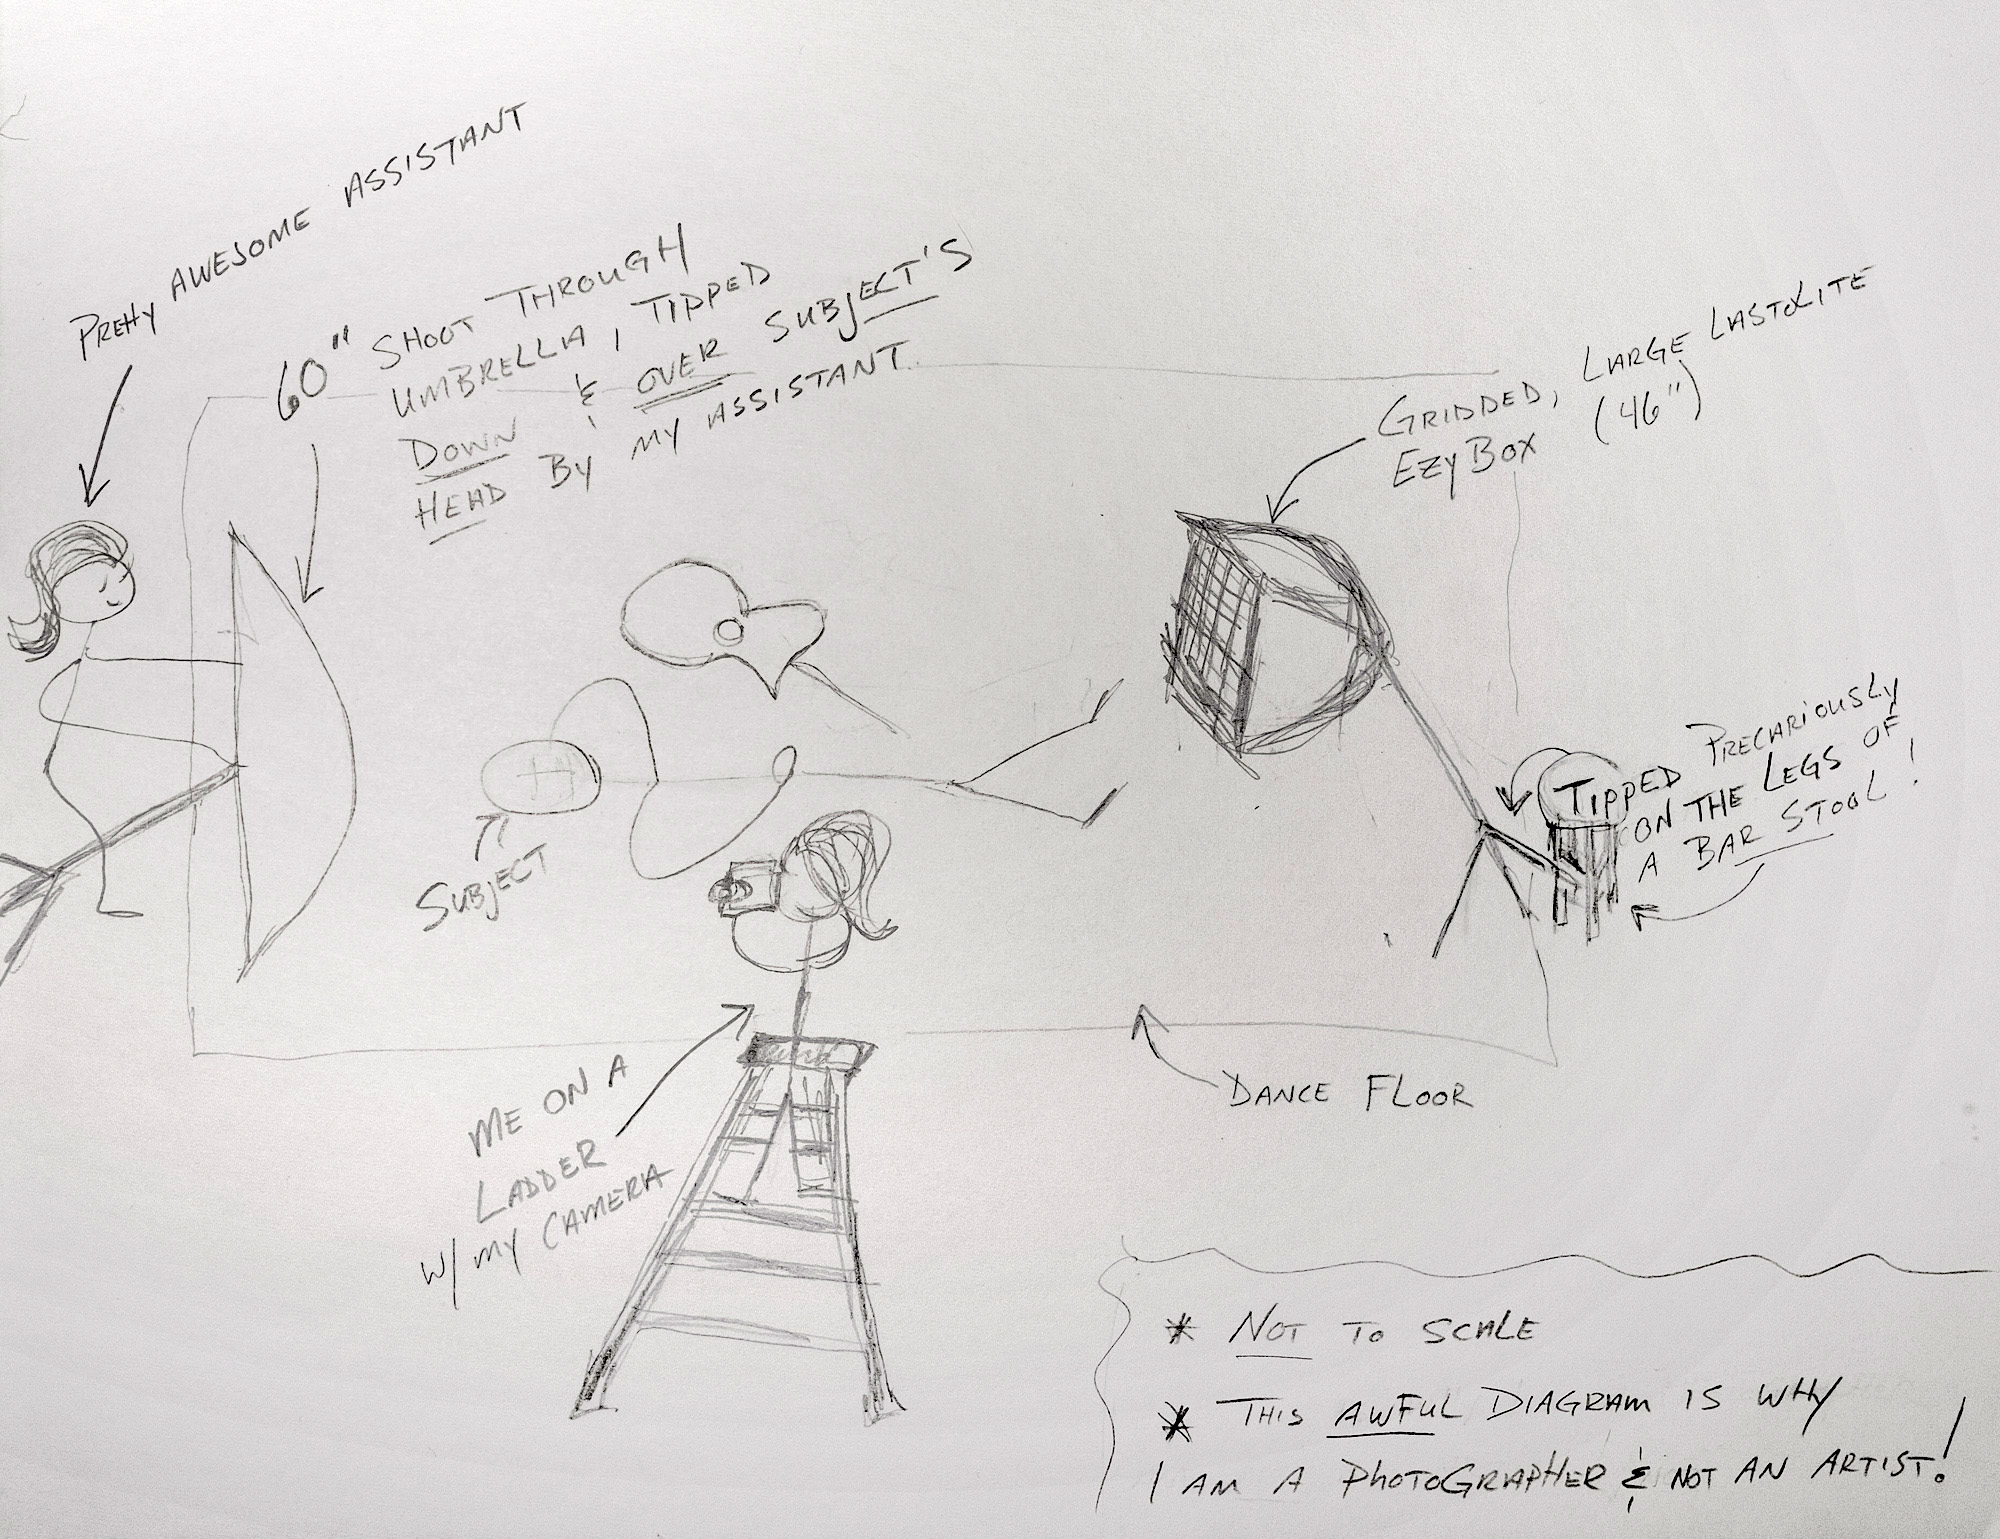
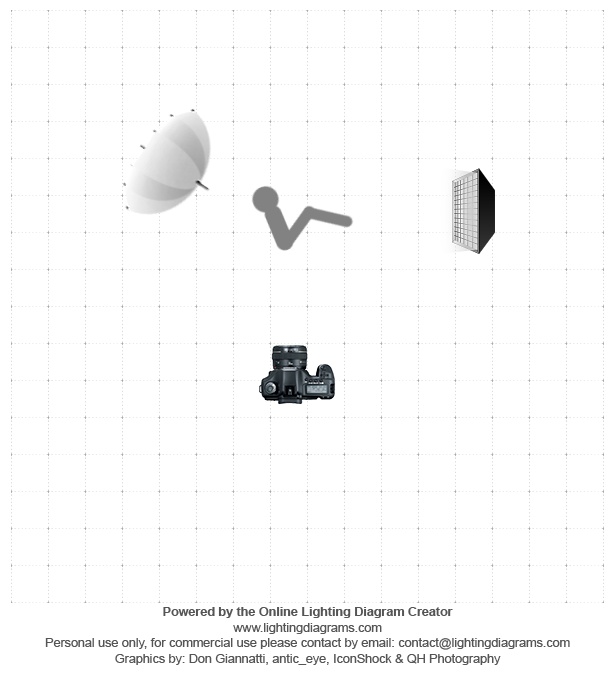
The room had several windows and it was midday and sunny outside. There was a lot of light coming in through the windows – too much, really – so I blocked the light with the 5-in-1 Oval Reflector in its black cover, which dimmed the room considerably. I had Scott lie down on the floor, showed him where I wanted his hands and where I wanted him to look, and placed his guitar next to him. I had one Speedlite on a stand in the 60″ shoot through umbrella, set somewhere around 1/8th power, if my memory serves. I had my assistant stand behind and slightly left of his head, tipping the umbrella and stand down and over about 3 feet from his face. I took a test shot and decided I wanted just a bit more light for the lower half of his body and some more catch lights in his eyes, so I used another Speedlite, set somewhere around 1/16th power, on a stand in the 47″ soft box with a grid. I needed that soft box angled down low over his feet and legs, but there was no one else to hold it in place. So I tipped and rested the legs of the light stand on a rung of the legs of a near by bar stool. The soft box was angled perfectly then, if a bit precariously. I quickly climbed my ladder got the shot.
Post Production
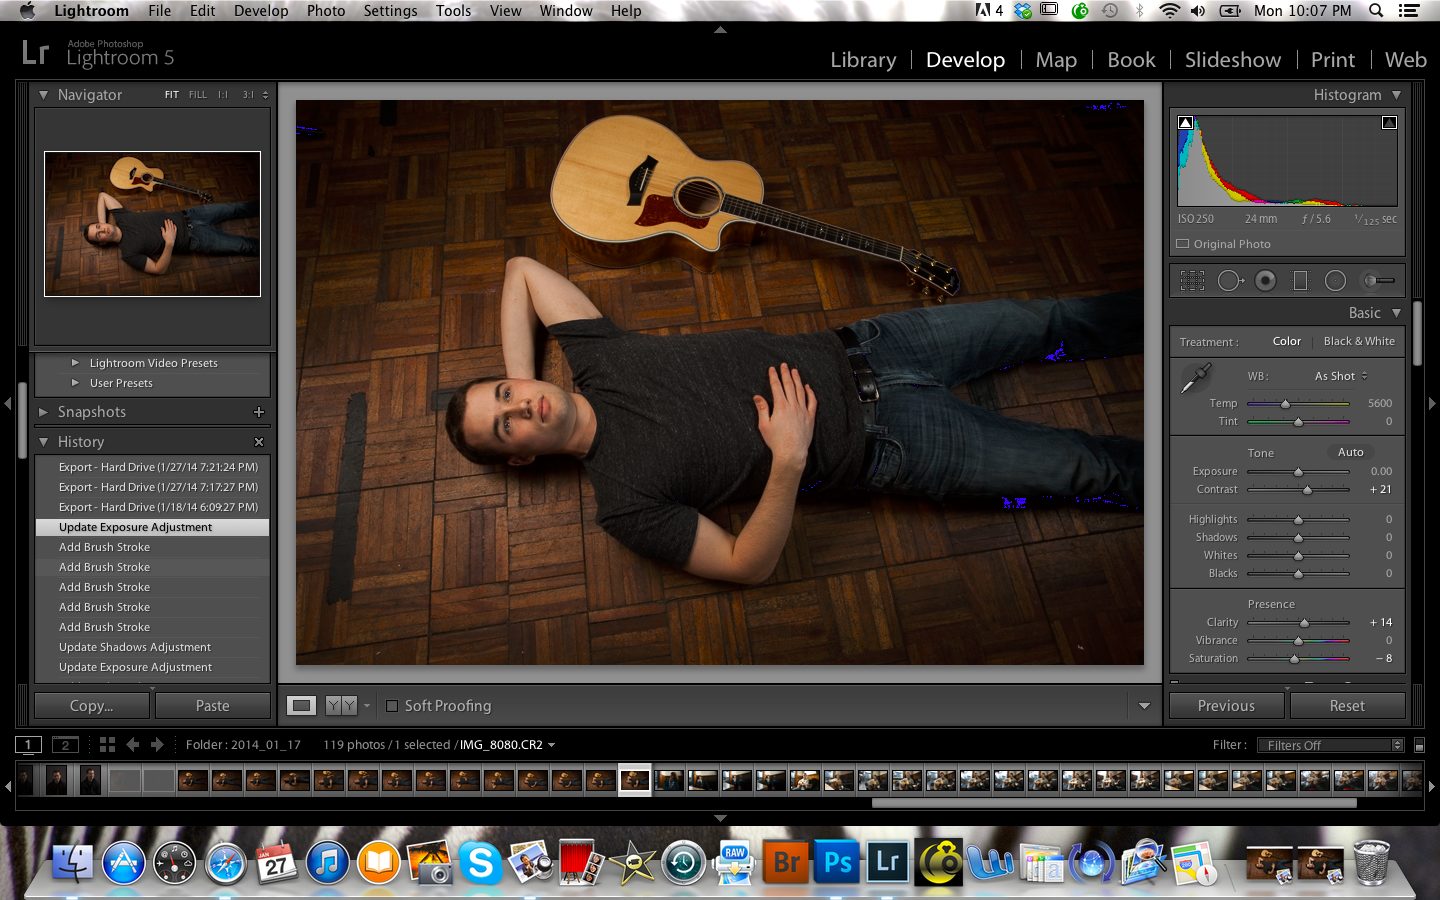
I routinely cull and edit all of my images in Lightroom, making my basic adjustments (temp, saturation, blacks, whites, highlights, shadows, contrast, clarity, sharpening) and then do the rest in Photoshop (retouching skin and eyes, dodging & burning, color toning using RadLab, curves, etc.). I didn’t alter this shot too much in post. I first made those basic adjustments in Lightroom (de-saturation, a bit of contrast, a bit of clarity, some slight cropping of the image, and burned the edges down with a little bit of vignette).
In Photoshop, I retouched the skin and eyes, cloned out the legs of the umbrella stand in the upper left hand corner, dodged & burned his face, body and guitar a bit, and did some color toning. And there you have it! The final image.
**I deeply apologize for my hilariously pathetic hand-drawn lighting diagram! If it’s not at all helpful, perhaps it will, at the very least, garnish a laugh or two. Just in case, I included a proper lighting diagram graphic, though it’s less informative.
Before and After
Please Support The Phoblographer
We love to bring you guys the latest and greatest news and gear related stuff. However, we can’t keep doing that unless we have your continued support. If you would like to purchase any of the items mentioned, please do so by clicking our links first and then purchasing the items as we then get a small portion of the sale to help run the website.
Also, please follow us on Facebook, Google+, Flickr and Twitter.
Get rid of the ads!
Did you enjoy reading this article as much as we enjoyed writing it? There's a way to support us and our reporting, getting ad-free navigation and more as a bonus. Subscribe to us for less than a coffee per month —just $3.99— or take advantage of our yearly subscription with a hefty discount for only $25.- An ad-free experience
- A free mystery box for Lightroom or Capture One
- All the books in our store
- 20% discount on Capture One
- 30% discount on Imalume Photo Theft Protection
- 20% off Herbs and Kettle Tea Company.
- 20% off your order from MPIX printing services.
- 5% off Viltrox Products via their eCommerce store.
- 10% off all film developing, printing and scanning services from Blue Moon Camera and Machine
- 15% off 7Artisans products: The lens and accessory maker is offering a sweet discount for Phoblographer's readers.