
Last Updated on 03/25/2020 by Mark Beckenbach
If you’ve been wondering about the equipment you need to set up your own studio, use this photography cheat sheet as your quick guide.
Decided on doing more portrait photography projects and now need the stuff to make it happen? If you already have a dedicated spot where you can set up your own studio, the next step is to get the necessary equipment. Since you most likely already have a camera or two, refer to today’s photography cheat sheet for the rest of the gear to get you started.
Consider the studio equipment listed in this cheat sheet by Digital Camera World as the bare-bones setup of your studio, especially if you intend to do professional portrait projects in the long run. Depending on how big your space is or how much natural light it may have, you may need more or less of these items, but that’s for another discussion. For now, let’s take a look at your studio essentials.
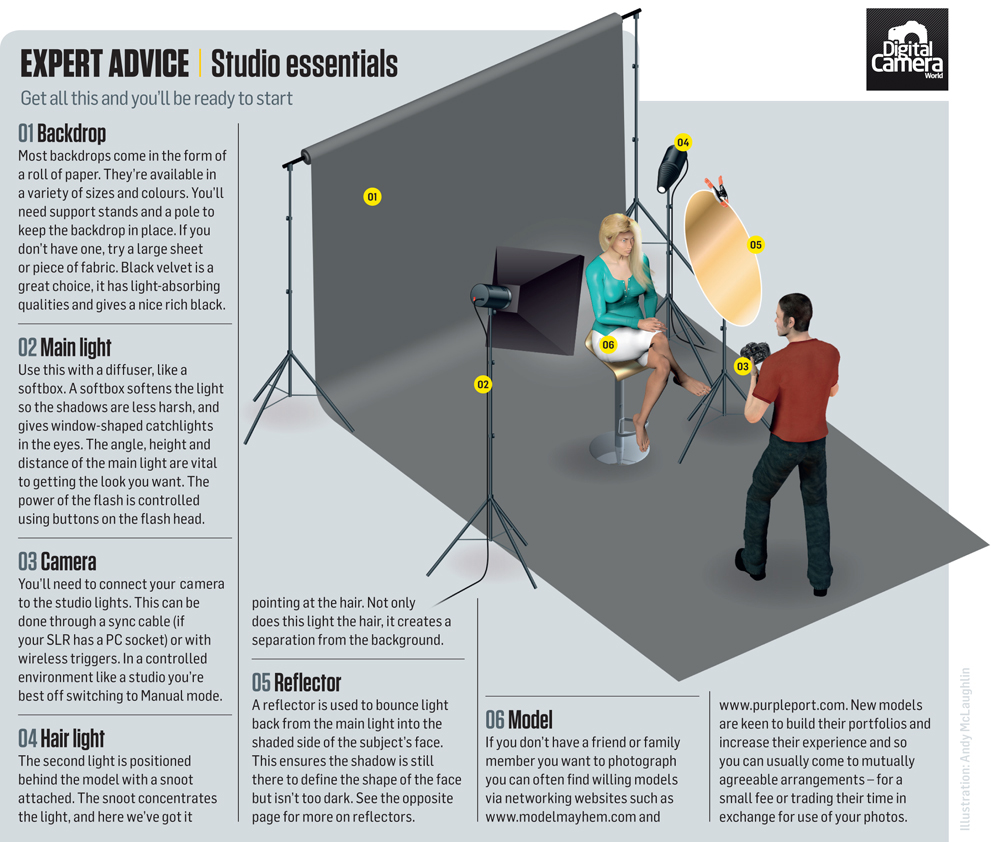
First, you’ll need a good backdrop. These can either come in a roll of paper or a large sheet of fabric. You’ll also need support stands and a pole to prop it up and keep it in place. If you’re on a budget, you can go for white and black backdrops first. Black velvet, in particular, makes a great choice as it absorbs light really well and produces a nice, rich black.
You’ll also need a main light source that you can use with a diffuser or light modifier. A softbox is one example, which you use to soften the light so the shadows aren’t harsh. It also creates a window-shaped catchlight in the eyes. You’ll also need to connect your camera to the studio light, either through a PC sync cable or wireless triggers. More tips on studio lighting can be found here.
Another light source you’ll need is the hair light, which must be placed behind the model with a snoot attached to concentrate the light. Point it at the hair to create effective separation from the background.
If your space has plenty of flattering natural light, sometimes you might only need to use a reflector to get great results. Reflectors are used to bounce light from your main light source to the shaded side of your subject’s face. This will make sure that the shape of your subject’s face is still defined but not too dark. Check out some tips on using the right reflector color here.
Once your studio is finally ready, you’ll need a subject to photograph. You can get a friend or family member to help you with this, or even get in touch with a model from social media and modeling websites. More tips on finding models for portrait photography practice here.
Need more photography tips and tricks like this? Don’t forget to check out our photography cheat sheet collection to find more that will come in handy for your next shoot and projects!
Get rid of the ads!
Did you enjoy reading this article as much as we enjoyed writing it? There's a way to support us and our reporting, getting ad-free navigation and more as a bonus. Subscribe to us for less than a coffee per month —just $3.99— or take advantage of our yearly subscription with a hefty discount for only $25.- An ad-free experience
- A free mystery box for Lightroom or Capture One
- All the books in our store
- 20% discount on Capture One
- 30% discount on Imalume Photo Theft Protection
- 20% off Herbs and Kettle Tea Company.
- 20% off your order from MPIX printing services.
- 5% off Viltrox Products via their eCommerce store.
- 10% off all film developing, printing and scanning services from Blue Moon Camera and Machine
- 15% off 7Artisans products: The lens and accessory maker is offering a sweet discount for Phoblographer's readers.