
Today’s photography cheat sheet is an alternate visual guide for understanding the Exposure Triangle for correct exposures.
One of the main parameters of a good photo is proper exposure, which is achieved by using the best camera settings given the situation. The shutter speed, aperture, and ISO all work together as the so-called Exposure Triangle. Maybe you’ve heard of this term in the past, or maybe this is still a totally new concept to you. Whichever the case, today’s photography will serve as your quick guide (or alternate guide, if you’ve seen it here before) with some visual analogies to help you understand exposure basics better.
The cheat sheet below by Olga Rook covers how shutter speed (exposure time), aperture (lens opening), and ISO (light sensitivity) values contribute equally to the overall exposure, and how increasing one value will require decreasing another to compensate. Shooting in manual mode means taking full control of all three values, so if you’ve never tried it before and want to practice, the visual guide should come in handy.
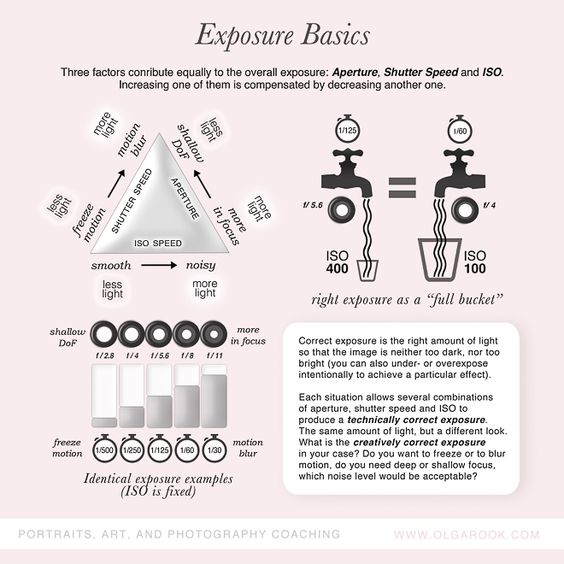
First, we see what each component of the Exposure Triangle does to your photos and how much light they let in. This is crucial info, as photography is basically all about working with light. Shutter speed, for example, can either freeze motion with fast speed or blur motion with slow speed. Fast shutter speeds also allow less light to reach the camera sensor (or film), while slow shutter speeds let in more light. Small apertures let in less light but keep more of the scene in focus, while large apertures let in more light but produce a shallow depth of field. Lastly, low ISO values are less sensitive to light but produce clear photos, and high ISO values are more sensitive to light but produce noisy (or grainy) photos.
To further illustrate this concept, there’s also a guide showing an example of how you can use different aperture and shutter speed settings but fixed ISO to produce identical exposures. A photo shot with an aperture of f2.8 and 1/500 sec shutter speed will look similar to that shot at f/11 at 1/30. However, the first photo will have a shallow depth of field or frozen motion, while the second photo will have more of the scene in focus but there will be some motion blur if anything in the shot is moving.
The bottom line? Technically, correct exposure refers to the right amount of light so that your photo won’t look too bright or too dark. However, there’s also a creatively correct exposure, which lets in the same amount of light but shows a different look or effect, as your scene or subject calls for it. As you go further into your photography journey, you’ll come across various techniques and effects that will not only give you the technically correct exposure, but also the creatively correct exposure, so go ahead and experiment!
Need more photography tips and tricks like this? Don’t forget to check out our photography cheat sheet collection to find more that will come in handy for your next shoot and projects.
Get rid of the ads!
Did you enjoy reading this article as much as we enjoyed writing it? There's a way to support us and our reporting, getting ad-free navigation and more as a bonus. Subscribe to us for less than a coffee per month —just $3.99— or take advantage of our yearly subscription with a hefty discount for only $25.- An ad-free experience
- A free mystery box for Lightroom or Capture One
- All the books in our store
- 20% discount on Capture One
- 30% discount on Imalume Photo Theft Protection
- 20% off Herbs and Kettle Tea Company.
- 20% off your order from MPIX printing services.
- 5% off Viltrox Products via their eCommerce store.
- 10% off all film developing, printing and scanning services from Blue Moon Camera and Machine
- 15% off 7Artisans products: The lens and accessory maker is offering a sweet discount for Phoblographer's readers.