
Last Updated on 03/03/2020 by Mark Beckenbach
Knowing the right shutter speed to use can make a big difference in the photos you take, as today’s photography cheat sheet explains!
There’s more to using the right shutter speed than getting properly exposed photos. It will also allow you to achieve certain effects and creative results. Your camera may have some automatic settings and functions that will help with this, but for shooting situations when you want to key in the shutter speed settings yourself, we have just the photography cheat sheet for you!
The quick guide below, by Digital Camera World, covers the different techniques you can do with both fast and slow shutter speeds. Whether you’re shooting in manual mode or shutter speed priority, these tips should be able to give you some great results.
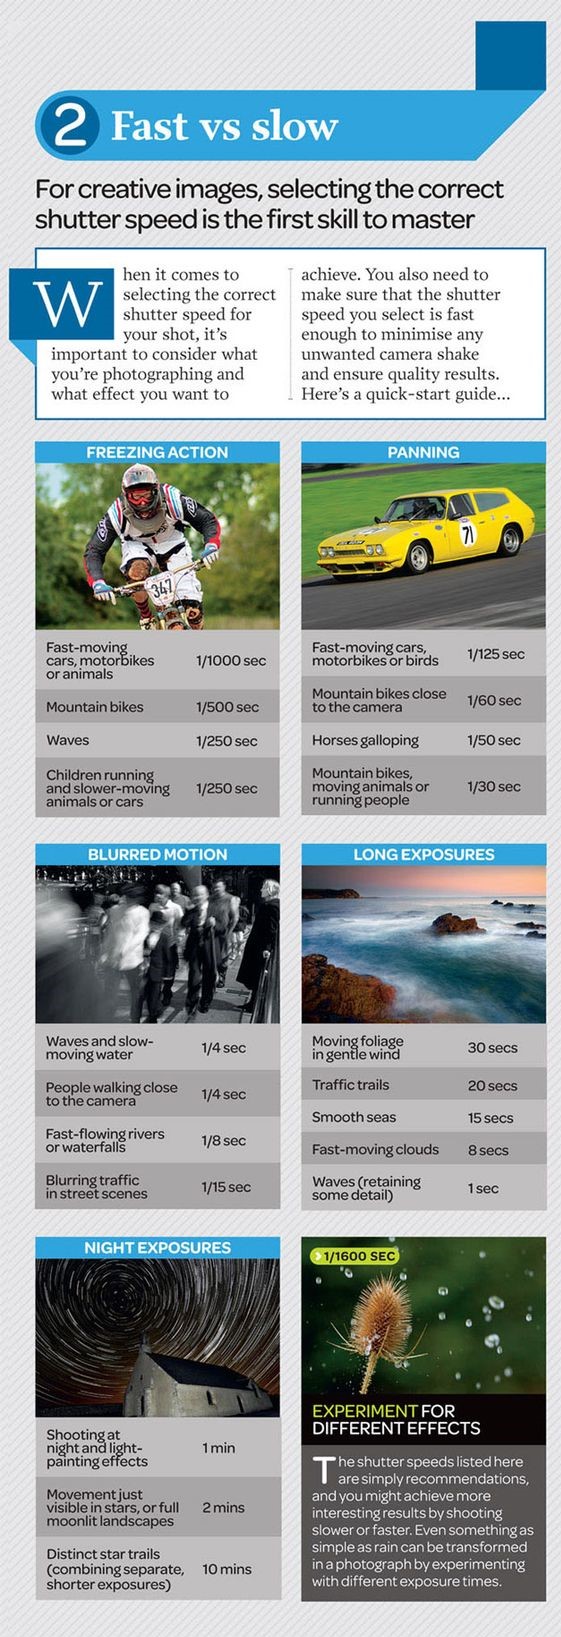
As mentioned in the cheat sheet’s intro, consider what you’re photographing and what effect you want to achieve. When it comes to freezing action or movement and camera panning, your shutter speed needs to be fast enough to prevent blurs apart from being exposed. For freezing fast-moving cars, motorbikes, or animals, a shutter speed of 1/1000 sec will do. For mountain bikes, use 1/500 sec; for waves and slower-moving subjects, use 1/250 sec.
If you want to do camera panning — which will let you keep your subject sharp against a blurry background to indicate movement — you also have several options. Set the shutter speed to 1/125 sec for fast-moving subjects, 1/60 sec for mountain bikes close to the camera, 1/50 sec for galloping horses, and 1/30 sec for moving animals, running people, and mountain bikes. Don’t forget to follow the direction of the moving subject as you shoot.
Slower shutter speeds will allow you to use blur and long exposures for some interesting creative effects. You may need to have a tripod at the ready, especially for long exposure landscape snaps, night exposures, and light painting. You can set your shutter speed to 1/4 sec to as slow as 1/15 to get the results you want when photographing a variety of moving subjects like waves, slow-moving water, walking people, fast-flowing rivers or waterfalls, and street traffic. For even longer exposures, you can go as slow as 30 secs, but prop your camera on a tripod for best results.
You’ll need to use even slower shutter speeds when shooting night exposures like astrophotography and light painting. A 1-minute long exposure is good for light painting and shooting at night in general, while longer exposures of up to 10 minutes will give you distinct star trails.
Feel free to experiment to get more interesting results! As mentioned in the guide, even something as simple as rain can give a great effect with the right shutter speed!
Need more photography tips and tricks like this? Don’t forget to check out our photography cheat sheet collection to find more that will come in handy for your next shoot and projects!
Get rid of the ads!
Did you enjoy reading this article as much as we enjoyed writing it? There's a way to support us and our reporting, getting ad-free navigation and more as a bonus. Subscribe to us for less than a coffee per month —just $3.99— or take advantage of our yearly subscription with a hefty discount for only $25.- An ad-free experience
- A free mystery box for Lightroom or Capture One
- All the books in our store
- 20% discount on Capture One
- 30% discount on Imalume Photo Theft Protection
- 20% off Herbs and Kettle Tea Company.
- 20% off your order from MPIX printing services.
- 5% off Viltrox Products via their eCommerce store.
- 10% off all film developing, printing and scanning services from Blue Moon Camera and Machine
- 15% off 7Artisans products: The lens and accessory maker is offering a sweet discount for Phoblographer's readers.