
Want to achieve the dreamy look of blurred moving water for landscape photography? Today’s photography cheat sheet sheds light on the key technique for you to try.
Blurring moving water to create the dramatic effect of time passing is one of the most popular techniques used by landscape photographers. The technique involves slow shutter speeds to produce a creative effect from the motion blur. However, there are some key elements involved to make sure you get the best results. Today’s featured photography cheat sheet will provide the elements you need.
The photography cheat sheet below, put together by Digital Camera World, outlines the process for making sure you get the right exposure when using slow shutter speeds for this technique. Because you’re making longer exposures, you’ll need to compensate by controlling how much light reaches the camera sensor.
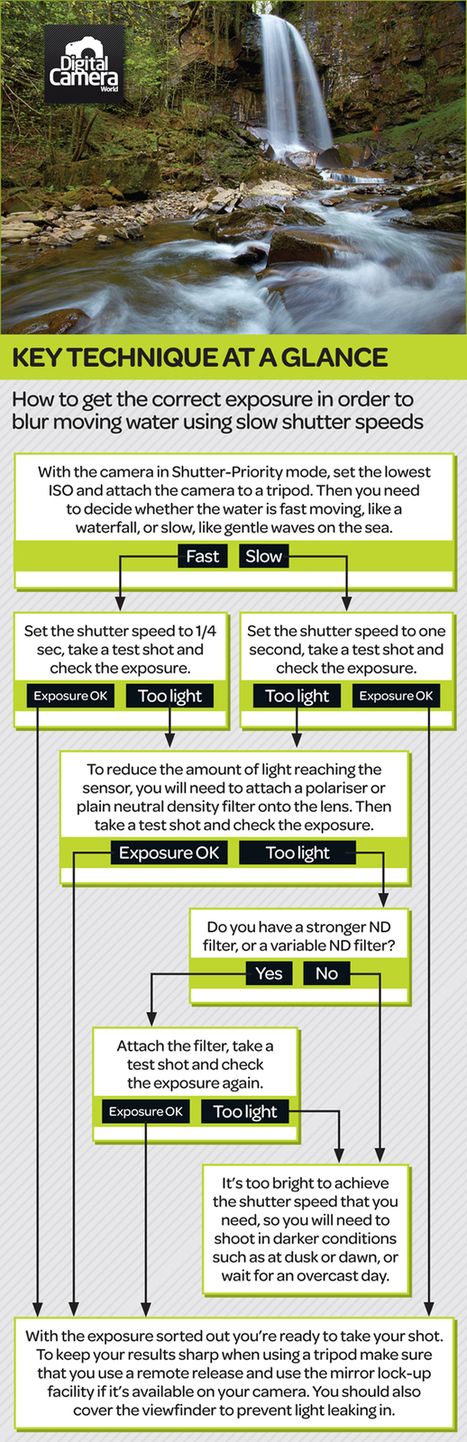
First, set your camera to Shutter Priority mode, choose the lowest ISO, and prop it on a tripod. Next, examine the movement of the water in your scene. If it’s fast-moving, set the shutter speed to 1/4 sec; if it’s slow-moving, set the shutter speed to 1 second. Then, take a test shot and check the exposure. If it looks too light, you’ll need to attach a polarizer or plain neutral density filter onto the lens to cut the light hitting the sensor. You may need to use a stronger ND filter or variable ND filter, or even shoot in darker conditions (dusk, dawn, or overcast) if the test shots still look too bright for the shutter speed setting.
If the test shot shows correct exposure, you can proceed to take your final shot. Make sure to use a remote release and the mirror lock-up function of your camera (if available) for sharp results.
Need more useful photography tips and tricks for your next shoot? Browse our growing photography cheat sheet collection!
Get rid of the ads!
Did you enjoy reading this article as much as we enjoyed writing it? There's a way to support us and our reporting, getting ad-free navigation and more as a bonus. Subscribe to us for less than a coffee per month —just $3.99— or take advantage of our yearly subscription with a hefty discount for only $25.- An ad-free experience
- A free mystery box for Lightroom or Capture One
- All the books in our store
- 20% discount on Capture One
- 30% discount on Imalume Photo Theft Protection
- 20% off Herbs and Kettle Tea Company.
- 20% off your order from MPIX printing services.
- 5% off Viltrox Products via their eCommerce store.
- 10% off all film developing, printing and scanning services from Blue Moon Camera and Machine
- 15% off 7Artisans products: The lens and accessory maker is offering a sweet discount for Phoblographer's readers.