
Want make the most out of shooting with your prime lens? This photography cheat sheet from Canon shows some quick tips to unleash the power of primes.
If you just bought your first DSLR or mirrorless camera, you’ll find that it usually comes with a kit lens, which is a good starter lens for practicing with your camera. But, once you’re a little further along, you might want to invest in a good prime lens, as many expert photographers will advise. Make sure you keep today’s photography cheat sheet handy for some quick tips on how to shoot with and make the most out of it!
Today’s featured guide was put together by Canon for those who are new to prime lenses. A prime lens, as they described, has only one focal length. So, if you want to get closer to your subject, you have to use your feet. While this may make it seem that prime lenses aren’t as convenient as zoom lenses, they actually have a major advantage: they have less moving parts, and so they’re smaller, lighter, and have faster apertures. A great example is a 50mm f1.4 lens, especially popular among portrait photographers and a great all-around, standard prime lens.
Now, on to Canon’s tips!
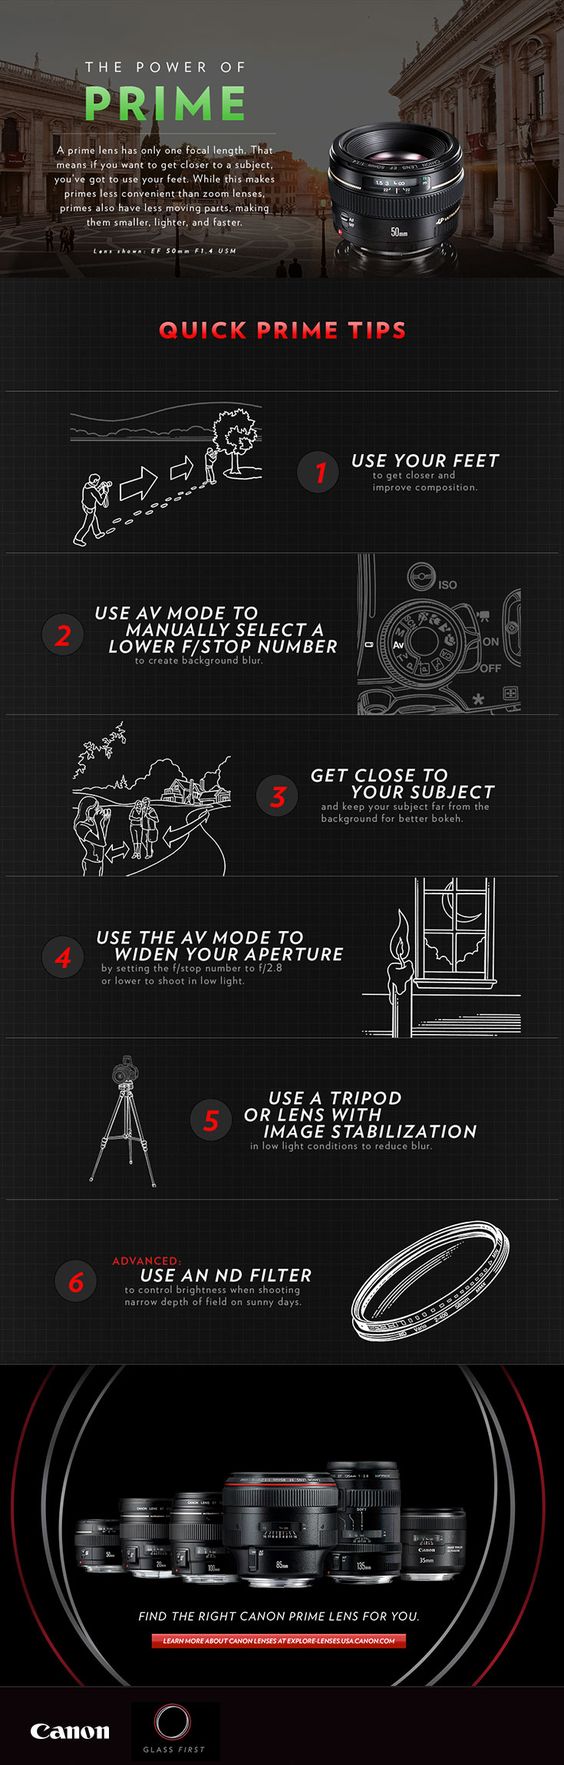
The first tip, of course, is to use your feet. If you’ve been spoiled by your kit lens, which is typically a zoom, you will have to practice composing by walking closer or farther from your subject, as your shot requires.
Next, use Av mode, or Aperture-Priority mode, so you can manually select wider apertures (lower f-number) and let the camera take care of the shutter speed. Wider apertures will allow you to blur the background for more creative shots, especially when shooting portraits. Make sure to also get close to your subject and position them far from the background to achieve more blur — or bokeh.
Shooting in Av mode and selecting wider apertures will also allow you to shoot in low light. Start experimenting with f2.8 and get wider as the situation requires. When shooting in dim lighting conditions, it’s recommended to use a tripod or turn on your lens’ image stabilization to reduce blur.
Lastly, for advanced photographers, keep an ND filter handy when you’re shooting with smaller apertures during sunny days. This tip is especially handy for landscape photographers, as smaller apertures will let them maximize the depth of field and keep the entire scene sharply focused. This often comes at the expense of slower shutter speed, and the risk of overexposure. The ND filter will help cut the light and control the brightness to keep a balanced exposure.
Want more photography tips and tricks like this? Make sure to check out our growing collection of photography cheat sheets!
Get rid of the ads!
Did you enjoy reading this article as much as we enjoyed writing it? There's a way to support us and our reporting, getting ad-free navigation and more as a bonus. Subscribe to us for less than a coffee per month —just $3.99— or take advantage of our yearly subscription with a hefty discount for only $25.- An ad-free experience
- A free mystery box for Lightroom or Capture One
- All the books in our store
- 20% discount on Capture One
- 30% discount on Imalume Photo Theft Protection
- 20% off Herbs and Kettle Tea Company.