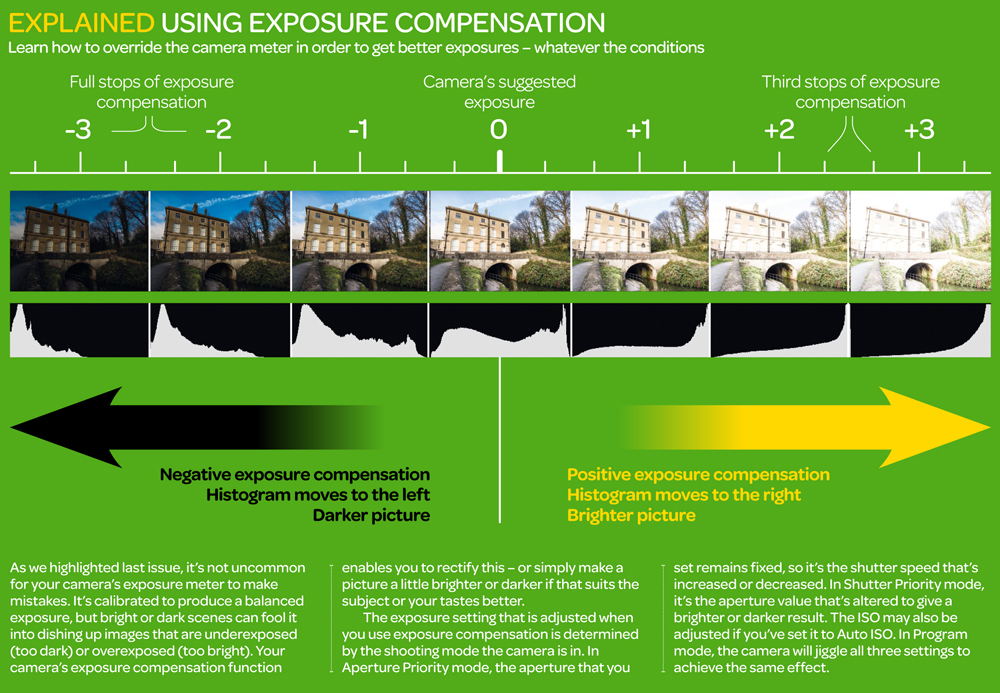
This quick photography cheat sheet shows how to use exposure compensation to override your camera’s meter to get better results.
Ever ended up with a poorly exposed photo even when your camera was set in one of the semi-automatic or program modes? This is not uncommon, so it’s important that you know how to make some adjustments and not rely on your camera’s meter all the time. You don’t even have to shoot in manual mode to do this. You only have to use your camera’s exposure compensation function, as today’s photography cheat sheet and tutorial with show you how.
The photography cheat sheet below is part of Digital Camera World and TechRadar’s tutorial on the Exposure Triangle, or how the aperture, shutter speed, and ISO are balanced to produce a well-exposed photo. This fundamental photography concept is at the heart of shooting in manual mode. But if you haven’t mastered it yet or your shooting situation calls for one of the semi-automatic modes, you still have exposure compensation at your disposal to control the outcome of your photo.

As mentioned in the cheat sheet, your camera’s light meter can sometimes make mistakes when the scene is too bright or dark, even if it’s calibrated to produce a balanced exposure. When you get an underexposed (too dark) or overexposed (too bright) photo, you can turn to exposure compensation to darken or lighten the photo to your liking. In the scale above, adjust the setting to the stops to the left before you shoot to get a darker photo, or to the right to get a brighter photo.
How does this work when you’re shooting in one of the semi-automatic modes? In Aperture Priority, the aperture is fixed on the setting you selected, so the camera adjusts the shutter speed. In Shutter Priority, it’s the shutter speed that is fixed, so it’s the aperture that is adjusted. The ISO may also be adjusted when the camera is set to Auto ISO. If you’re shooting in Program mode, the camera will adjust all the three settings to achieve the necessary compensation.
Exposure compensation is a handy function for shooting in tricky lighting conditions, as you’ll learn in another useful photography cheat sheet.


