
Cropping in your framing or in post-processing is necessary for portrait shoots. Let this photography cheat sheet serve as your guide to do it effectively.
The concept of composition is the foundation of any outstanding photo, and it’s especially the case for portrait photography. Part of compositon is deciding which part of your subject appears in your shot. Whether composing through your camera or cropping in post, you don’t want to ruin a perfectly good portrait by trimming it at an awkward part. To that end, this simple photography cheat sheet will be a handy guide for you.
As Digital Camera World noted in the cheat sheet they assembled, this easy guide depicts some of the best parts to crop and where not crop a subject in portrait photos. The green lines show where to do the trim, while the red lines indicate where to avoid the cut.
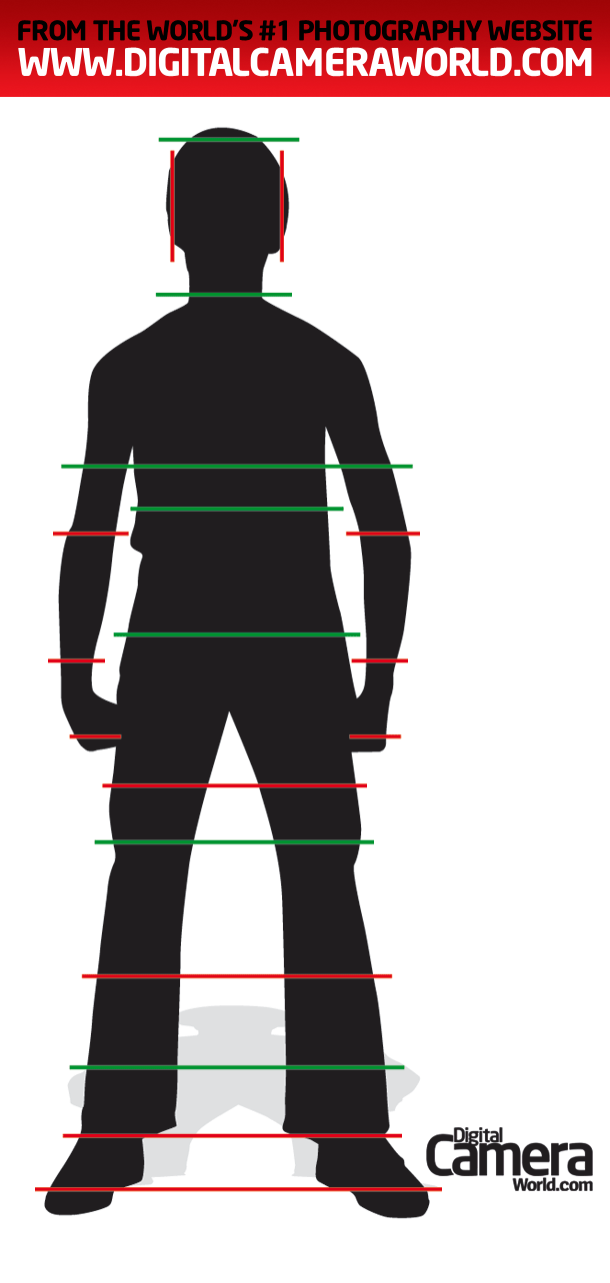
The green areas marked are typically seen in many professional portraits and formal headshots. If you want to get really close and tight for some creative portraits, you can go with cropping or framing along the first two green marks. Half-body shots can be cropped as high or low as the areas marked in the middle.
Arms and hands are often among the tricky areas to crop, and it’s always easy for the beginner to miss these. Cropping at the elbows, wrists, and hands are particularly common mistakes. It’s also good to know which areas to avoid trimming along the legs and feet when you’re shooting full body shots outdoors or in the studio. The rule of thumb is to not crop at the joints to avoid awkward portraits.
Need more portrait photography resources? Do check out our portrait photography tips for more tutorials and cheat sheets like this.
Get rid of the ads!
Did you enjoy reading this article as much as we enjoyed writing it? There's a way to support us and our reporting, getting ad-free navigation and more as a bonus. Subscribe to us for less than a coffee per month —just $3.99— or take advantage of our yearly subscription with a hefty discount for only $25.- An ad-free experience
- A free mystery box for Lightroom or Capture One
- All the books in our store
- 20% discount on Capture One
- 30% discount on Imalume Photo Theft Protection
- 20% off Herbs and Kettle Tea Company.
- 20% off your order from MPIX printing services.
- 5% off Viltrox Products via their eCommerce store.
- 10% off all film developing, printing and scanning services from Blue Moon Camera and Machine
- 15% off 7Artisans products: The lens and accessory maker is offering a sweet discount for Phoblographer's readers.