
Editor’s Note: Creating the Photograph is an original series where we interview photographers about a photo that they shot and how it was achieved. The results are some knowledge passed on to you. Want to be featured? Email chrisgampat[at]thephoblographer[dot]com
Hannes Friesenegger is a 23-year-old Austrian photographer who finds the darker tone. He’s done work for a number of clients: Austria’s Next Top Model, Polo Couture, and Felix Haspel among them. Hannes’s vision and attention to detail culminates in beautiful photographs, and we were struck by the inherent beauty in “Sophie in Vienna” which we are featuring.
Here’s how he created it.
The Concept
To be honest: There was no real concept for this shooting. The whole image was just an idea that got stuck in my head for a while and I finally managed to realize it. I did not only want to shoot a pretty girl in an old viennese street- the main idea was to create a specific atmosphere. “Naglergasse”, a small side street in viennas City Center, seemed to be the perfect location. The shady, dark street is a great contrast to Sophie’s white dress.
The Gear
Canon EOS 5D Mark II with the 50mm f1.4
One Speedlite 430 EX II
SMDV Firefly Pro Beauty
Softbox Diffuser 60cm
Walimex WT-806 256cm
2x Yongnuo Trigger E-TTL
YN-622C
Sandisk Compact Flash
Extreme 32GB 60MB Edition
Photoshop CS5
Macbook Pro 2.0 i7 10 GB
DDR3 Samsung 830 256 GB SSD
The Shoot
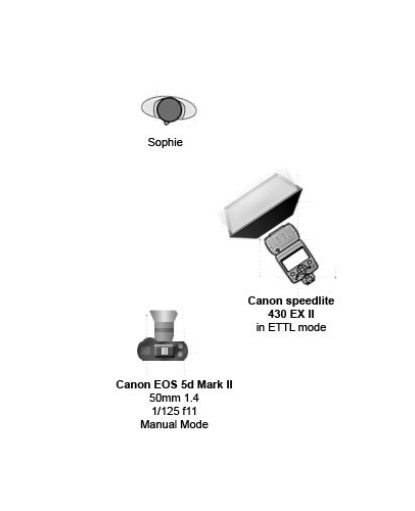
We went to the Naglergasse to take the first shots. I usually shoot in Manual Mode when I do triggering but I started to like the ETTL-Mode with the Flashes. I used f11 to get a dark nice look.After 20 Shots of these we went to another location (see pictures) but this one was my favorite one so far.
There wasn’t really much to it, just a very simple one light special.
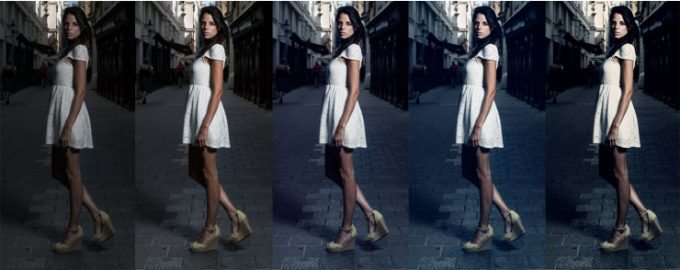
Post Production
Arriving at the Post Production phase I wanted to highlight the model and stylize the image a bit – pop up the contrast and direct the eye of the viewer to the figure. I made screenshots of the stages leading to the final image:
Step 1:
Gradient map: blending mode: luminance 39% opacity
black to white
– Saturated the skintones
– Curves: lightened everything except the sky and the buildings in the background
Step 2:
– Curves: darkened the shadows
– Gradient map: blending mode: linear dodge
18% opacity
dark blue to bright turquoise
Step 3:
– Gradient map: blending mode: linear dodge
5% opacity
medium blue to bright turquoise
– Gradient map:
blending mode: luminance
67% opacity
black to white
Step 4:
– Curves: darkened the picture, highlighted the contrast
– Hue/Contrast: final tweaks
Step 5:
-Contrast: more blacks
-Saturation: a lil bit of yellow
Be sure to check out Hannes on 500px, Facebook page, blog, and his website.
Please Support The Phoblographer
We love to bring you guys the latest and greatest news and gear related stuff. However, we can’t keep doing that unless we have your continued support. If you would like to purchase any of the items mentioned, please do so by clicking our links first and then purchasing the items as we then get a small portion of the sale to help run the website.
Also, please follow us on Facebook, Flickr and Twitter.
Get rid of the ads!
Did you enjoy reading this article as much as we enjoyed writing it? There's a way to support us and our reporting, getting ad-free navigation and more as a bonus. Subscribe to us for less than a coffee per month —just $3.99— or take advantage of our yearly subscription with a hefty discount for only $25.- An ad-free experience
- A free mystery box for Lightroom or Capture One
- All the books in our store
- 20% discount on Capture One
- 30% discount on Imalume Photo Theft Protection
- 20% off Herbs and Kettle Tea Company.
- 20% off your order from MPIX printing services.
- 5% off Viltrox Products via their eCommerce store.
- 10% off all film developing, printing and scanning services from Blue Moon Camera and Machine
- 15% off 7Artisans products: The lens and accessory maker is offering a sweet discount for Phoblographer's readers.