Last Updated on 04/23/2013 by Julius Motal

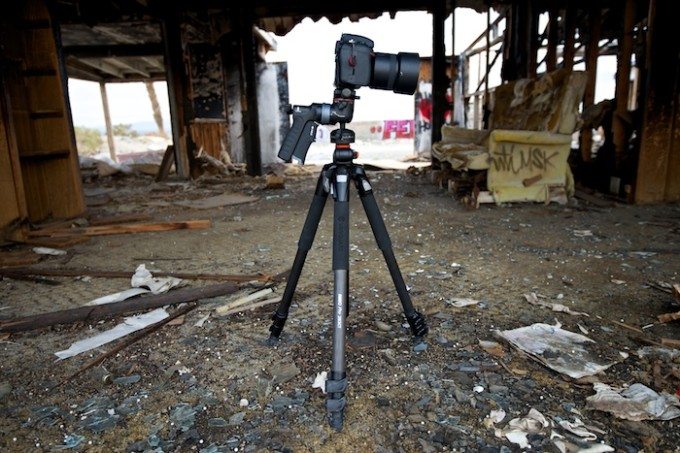
I’ve only owned two tripods my entire life and even though I use one for almost every shoot, each has somehow surpassed its life expectancy. These two weren’t raised in a bad neighborhood but after I’m done with them they wish they had. Needless to say I treat my tools as such and they get worn. Enter my third tripod, the Vanguard Abeo Pro 283CGH kit.
I’ve been interested in a pistol grip styled tripod head for a while because of its perceived convenience. In theory, the grip would also solve my biggest problem with tripods: difficulty using them in the cold. Unfortunately,d I didn’t make it to the snow for this trip but I did put it through some work. Read on to see how the new tripod from Vanguard fairs in our review.
Pros and Cons
Pros
Each leg has padding
Can be adjusted to reach any imaginable angle
Head allows for smooth 360 degree pans
Cons
Pistol grip loosen / tighten lever
Clunky removable rubber feet
Doesn’t play very nice with my Capture Base Plates
Gear Used
Vanguard Abeo Pro 283CGH which includes:
Abeo Pro 283CT Carbon Fiber Tripod Legs
Tech Specs
Abeo Pro 283CT:
- Number of Leg Sections 3
- Leg Diameter 28mm (1.10″)
- Bubble level 1 pcs
- Extended height 1550mm (61.02″)
- Min. Extended Height 1240mm (48.81″)
- Folded height 600mm (23.62″)
- Max Load Capacity 8 kg (17.63lbs)
- Weight 2.05kg (4.51lbs)
GH-300T:
- Innovative Shutter Release Trigger on grip
- Grip Position Release: position your camera with ultra speed
- 38mm universal quick release system
- Two panning axes: 72-click point base for perfect panorama and second base for following action
- Ergonomic handle rotates 360 degrees to 8 different positions
Specs provided by Adorama.
Ergonomics
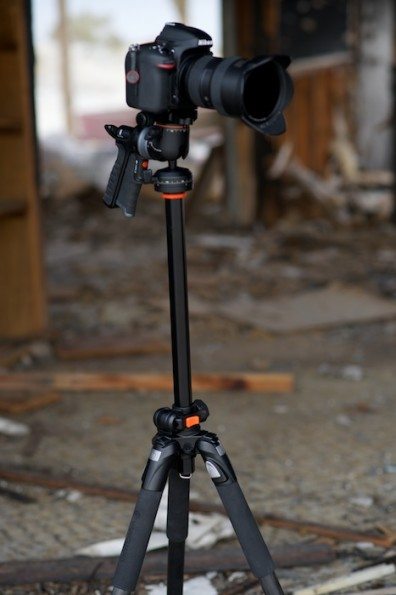
There are a lot of knobs and levers on the 283CGH kit and we are going to start at the top. First off, we have the tripod plate which is an Arca Swiss compatible mount. The knob on the side that secures the plate has a grippy rubber strip that makes tightening / loosening a cinch, even with gloves. This same top plate also has two bubble levels, one for landscape and portrait positions.
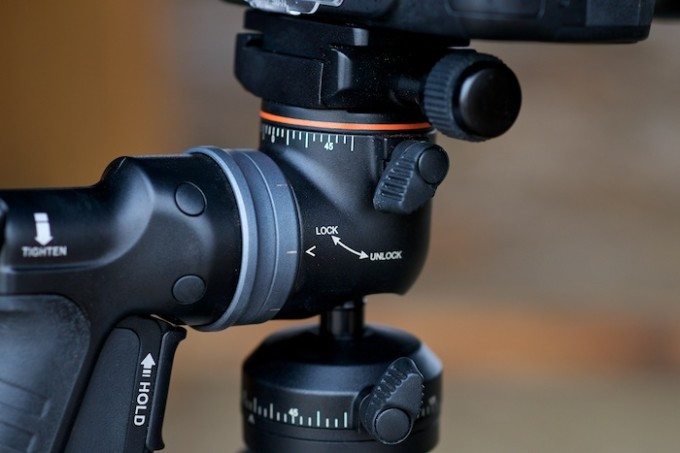
Just below the top plate on the right hand side of the grip is a small lever that will allow the top plate to spin 360 degrees. As you spin the top you can keep track of your angle by following the marked paint. Once you have your angle set, just tighten the lever and it will hold your position tight. It should be mentioned that this ring, compared to the lower one, has grooves or bumps which feel similar to an old manual aperture lens. These steps are meant for more precise angles and not panning in video.
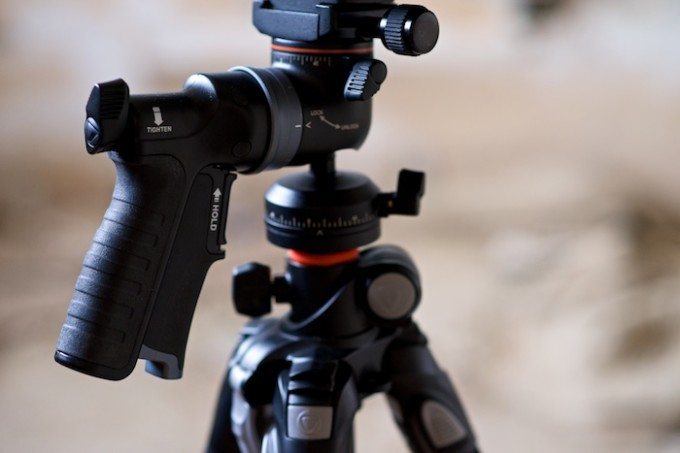
Following the ball head further down we will find the grip. It is covered in a hard rubber and has quite a comfortable feel. On the back of the grip there is a loosen / tighten lever which still frustrates me a bit still to this day. In order to move the grip to any other angle the lever must first be loosened and then tightened again after the move is complete.
Closer to the base of the ball head there is a silver ring that allows you to change the angle of the grip. Changing this ring will not change the angle of the camera itself but instead the angle the grip is being used from.
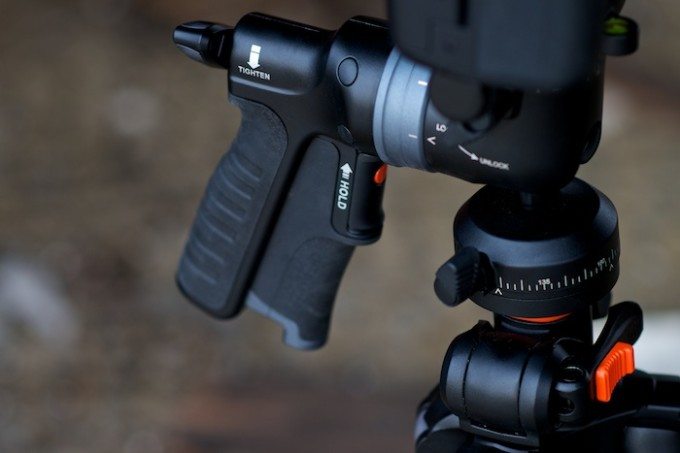
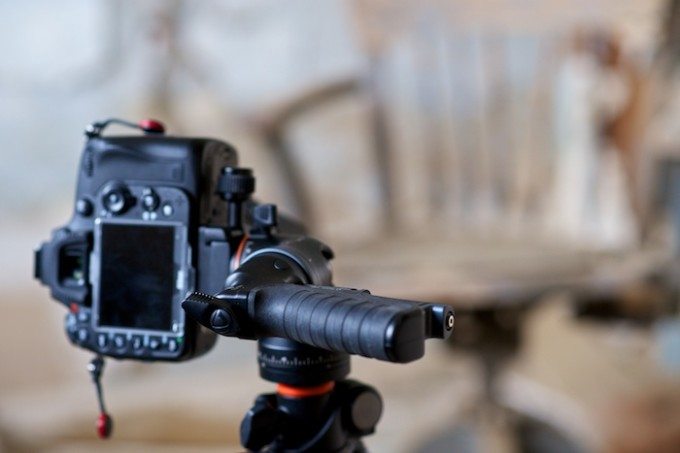
On the front of the grip where your index finger would rest is a hold switch with a little orange trigger button. This leads to one of the unique features of the GH-300T head which is the ability to fire your camera from the grip. At the bottom of the grip is a small auxiliary port in which you can plug one of the two included cables into, the other side plugs into a compatible camera. These two cables are compatible with various cameras, the supported list can be found here. When the cable is seated it allows you to either do single shots or a long exposure.
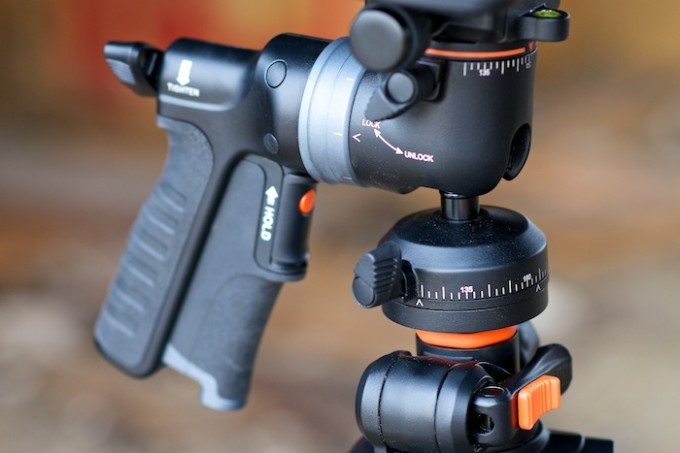
At the base of the ball head is the second 360 degree panning mechanism. This one like I mentioned before is smooth and stepless unlike the upper one. You would use this when recording video or panning quickly for chasing your subject. This combined with the trigger release above could change the way you chase / capture your subjects.

Going down the spiral lower to the first knob on the tripod legs itself which controls the center column. Loosening this knob a couple twists frees the center to be raised. It should be said that the center does not turn, it just raises up and down. At the bottom of the center column, there is a release button as well as a hook to hold additional weight to help stabilize.
On each of the legs there is a gray button about the size of your thumb. Pressing in this button will allow the legs to lock in place at 25, 50 and 80 degrees.
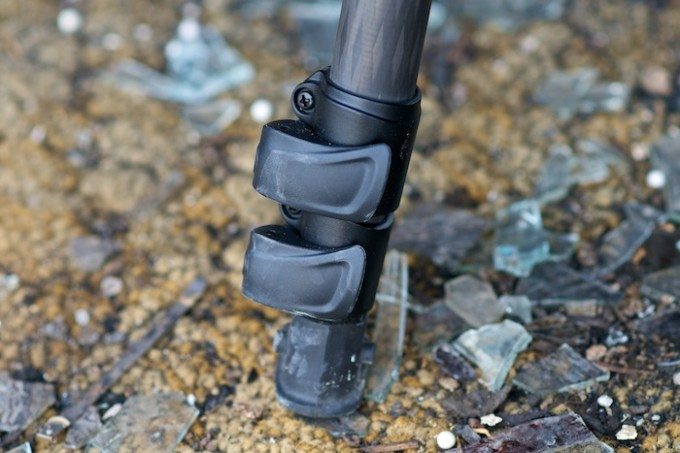
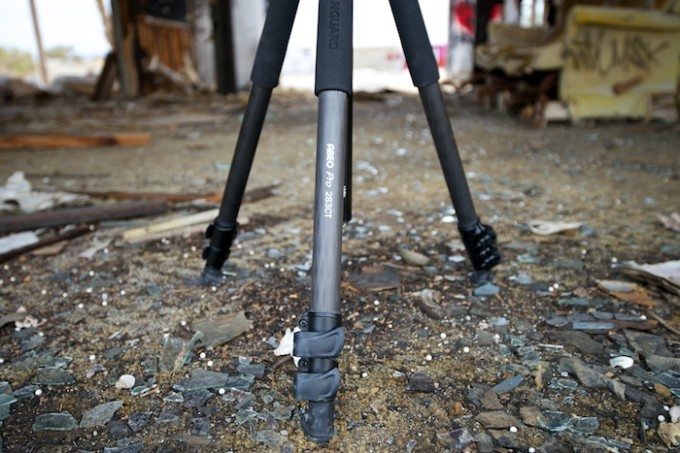
Towards the bottom of the tripod there are two clamps which will release 48 inches of carbon legs. This particular model of tripod only has two clamps and they are easy to handle even with gloves.
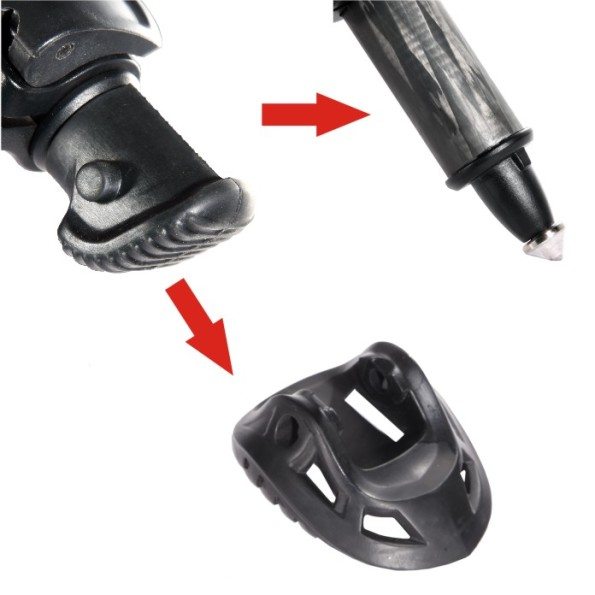
The three feet of the tripod come with three big clunky rubber shoes. These can provide better grip on snow or sand. If you are nowhere near those elements you can remove those big feet to uncover normal sized rubber feet underneath. Yet there is another layer to the feet and when you remove the regular set, the tripod’s spiked feet will be revealed. These spike-tipped fit would work perfectly when placing the tripod on ice or a similar surface.
Build Quality
Overall the tripod is built very well and it is extremely sturdy. It held my cameras with confidence, even when it was at odd angles.
I’m still warming up to arca-swiss mounts because I always fear the camera just slipping off. The rubber grip mentioned earlier makes it easy to tighten and hold in place. Even though it felt tight, the mount didn’t make me feel comfortable until I put it through a good amount of testing. On the top where the plate locks in there is a metallic bump that prevented slippage if it was slightly loose. This same bump is what prevents Peak Designs Capture Plates from being released easily. From what I’ve noticed from using plates, it’s usually best to stock up on the manufacturer’s plates instead of using something that’s “compatible”.
After a fair amount of use the part of the tripod that held the head became a bit loose. Vanguard included a few tools with the tripod and it was easily tightened.
All knobs, clamps and levers are extremely well made as well as easy to adjust. Levers that allow you to tighten or loosen don’t exactly lock but when they are tight they don’t let go unless bumped. A couple of the levers like the ones that allow you to pan the head 360 degrees only came loose a couple of times. I most likely got a lucky hit in there so I’m not blaming the tripod.
My last tripod had just a bit of foam on one of the legs and although it seems like nothing, that padding made a big difference. That one leg became my favorite leg after slinging the camera over my shoulder after long trips. My hands also favored that one leg because it kept me from gripping the cold metal. Now that the Vanguard has three padded legs it means that I’ll be much more comfortable in the field and my use so far proves that. If you’ve never been there then you’ll never know, these padded legs are a luxury item. While roaming the outdoors I’ve seen plenty of photographers tape large pads to their tripods for this kind of comfort. When it comes to grasping the tripod in the cold it should be mentioned that the carbon fiber legs are much more comfortable to hold and move.
This is not mentioned in the listing but the kit comes with a very nice bag that holds both the tripod and the head. I’m keeping the included tools in the bag for safekeeping. I’ve used bags like these before when flying and they make it really convenient to travel with it slung over your shoulder.
Ease of Use / Performance
Here is a demonstration of the tripod + head and all of it’s features by Vanguard themselves. This video is of the 283AGH kit but they are essentially the same.
Normally I would ignore the whole ease of use when it comes to tripods but this isn’t your normal set of legs. The legs and head combo can get you into any possible angle that you can think of. The center column has an unusual trick up its sleeve which Vanguard calls Instant Swivel Stop-n-Lock or ISSL. To perform this maneuver all you have to loosen the center column, undo the clamp with the orange tab and pull the center up then through the center of the tripod. Once the center is free you can close the orange clamp to lock the angle of it in place. This is performed in the video above is easier than I make it out in text here.
As previously mentioned, the legs do lock into place at specific angles as well as any other angle that’s needed. As long as there is a fair amount of weight the legs stay put and because they are made of carbon fiber they also keep vibrations to a minimum.
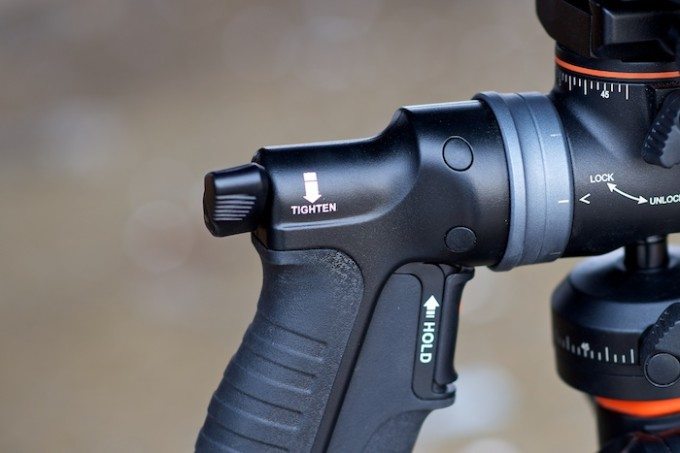
The part adjusted the most on the tripod isn’t the legs but the GH-300T’s pistol grip. Since this is the most common movement, you will either get to love or hate the grips “tighten / loosen” lever. I find that I do quite a bit of adjusting because the surface below me is always changing. I found the most frustrating thing about the tripod was this simple lever. I just never got in the rhythm of loosening it before every single adjustment. The head is actually really firm when left tightened, even when engaging the grip. If I left the tension in the middle the head became too easy to bump or move, this brought me to leaving it somewhere in the 3/4 zone. In a perfect world squeezing the grip would loosen the tension without the need of a dedicated lever leaving out an additional step.
The trigger to activate the shutter on my Nikon worked really well. I used it with my D600 and I found it quite straightforward. The cable isn’t too long and it could easily be stashed in a bag in instance you want to do a long exposure. I didn’t use it in any professional way besides pretending that my camera was some kind of machine gun. Due to the fact that it is right below the grip you may want to be careful that your hand doesn’t slip down and possibly bend the cable.
Next to the grip’s tension lever, the large removable feet were my second least favorite feature. I left them on at first but I found them to be obnoxious. I’m sure in certain instances they are great but I unfortunately didn’t do any sand or snow shooting to properly test them. If you have the feet on and try to use the tripod as a monopod the feet would just get in the way. The final negative thing I have to say about them is that they seemed to come off too easily. I had to retrace my steps at one point to find one. Maybe Vanguard meant the feet to only be used when needed? In that case I would recommend packaging them separately as an accessory instead of coming on the tripod out of the box.
Conclusion
I started off with one of those cheap $30 tripods which were made out of plastic and an aluminum can. This did the job for so long until it finally broke one year in NYC on a trip. I ran into B&H and then bought my second one which is all metal and was quite the upgrade. I used each of them for 3+ years and now I’ve graduated to the Vanguard discussed in depth here. A tripod has limited uses and functions but this one does them all very well while adding in a few tricks. The kit here will allow me to be more comfortable while carrying, setting up and putting away the tripod. Precision will also be easier to acquire due to the simple pistol grip instead of dedication knobs for different planes.
There will always be little nitpicks and complaints but overall the tripod moves as I wish. It also stays in place in better than my previous two even with my Mamiya RB67, which usually makes any tripod wobbly. If you are in the market for a solid carbon fiber tripod with a slick pistol grip ball head this may be the one for you. My Vanguard has become my go to support system for my various cameras and will see many beautiful places by my side.
Please Support The Phoblographer
We love to bring you guys the latest and greatest news and gear related stuff. However, we can’t keep doing that unless we have your continued support. If you would like to purchase any of the items mentioned, please do so by clicking our links first and then purchasing the items as we then get a small portion of the sale to help run the website.
Also, please follow us on Facebook, Flickr and Twitter.
Get rid of the ads!
Did you enjoy reading this article as much as we enjoyed writing it? There's a way to support us and our reporting, getting ad-free navigation and more as a bonus. Subscribe to us for less than a coffee per month —just $3.99— or take advantage of our yearly subscription with a hefty discount for only $25.- An ad-free experience
- A free mystery box for Lightroom or Capture One
- All the books in our store
- 20% discount on Capture One
- 30% discount on Imalume Photo Theft Protection
- 20% off Herbs and Kettle Tea Company.
- 20% off your order from MPIX printing services.
- 5% off Viltrox Products via their eCommerce store.
- 10% off all film developing, printing and scanning services from Blue Moon Camera and Machine
- 15% off 7Artisans products: The lens and accessory maker is offering a sweet discount for Phoblographer's readers.