Last Updated on 12/05/2019 by Mark Beckenbach
Want to shoot better natural light portraits? With the tips from today’s photography cheat sheet, you should be able to make the most out of different natural lighting conditions.
When done right, shooting in natural light can yield some gorgeous results, especially for portraits. But the main challenge with it is it’s constant light, so you have to make adjustments and adapt your shooting style and settings to account for that. Today’s photography cheat sheet especially addresses that with some tips on two styles you’ll typically use in natural light portrait photography.
In her infographic for Pretty Presets, Gayle Vehar shared a handful of useful tips for shooting in backlight and bright sunlight conditions. While natural light photographers work with these two scenarios all the time, beginners can find it a little challenging to get great results. The tips will help make sure the backlit shots aren’t underexposed, and the ones shot in bright sunlight aren’t overexposed.
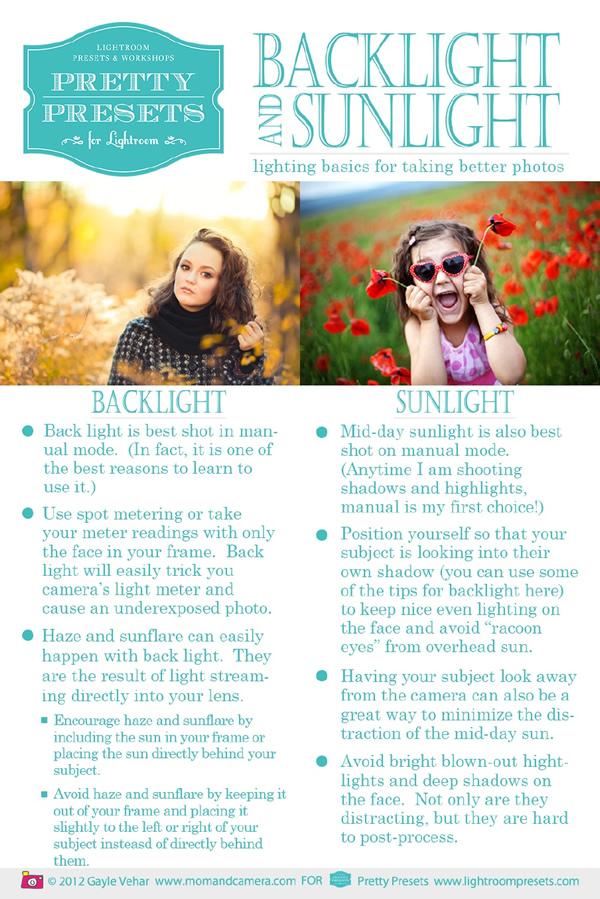
Both backlighting and shooting in bright sunlight are best done in manual mode, because your camera can be tricked to overexpose or underexpose to keep the exposure balanced. For backlit portraits, it’s important to use spot metering, or better yet, meter only the face of your subject. This will make sure your camera doesn’t underexpose the shot as a result of the back lighting tricking the built-in light meter. Shooting in manual mode will also let you set the aperture and/or shutter speed based on the reading of your handheld light meter.
Haze and flares also typically happen when shooting backlit portraits. You can either incorporate it in your shot to produce creative results, or exclude it in your shot if you want to keep it simple. Include the sun in your shot or have it directly behind your subject to get the haze or flare if you want the former, or simply keep the sun out of the frame for the latter.
When shooting in bright sunlight, avoid having the sun directly overhead your subject, as it will cause unflattering “racoon eyes.” Instead, have them face their own shadow for a nice and even lighting on the face. You can also make your subject look away from the camera. Another trick not mentioned here is to look for open shade, preferably surrounded by white or light-colored walls that will bounce the light around and create a nice, diffused light.
Lastly, check your histogram to make sure that the highlights aren’t blown out and there are no deep shadows on the face. This will make post-processing a lot easier for you.
Need more photography tips and tricks like this? Don’t forget to browse through our photography cheat sheets so far!
Get rid of the ads!
Did you enjoy reading this article as much as we enjoyed writing it? There's a way to support us and our reporting, getting ad-free navigation and more as a bonus. Subscribe to us for less than a coffee per month —just $3.99— or take advantage of our yearly subscription with a hefty discount for only $25.- An ad-free experience
- A free mystery box for Lightroom or Capture One
- All the books in our store
- 20% discount on Capture One
- 30% discount on Imalume Photo Theft Protection
- 20% off Herbs and Kettle Tea Company.
- 20% off your order from MPIX printing services.
- 5% off Viltrox Products via their eCommerce store.
- 10% off all film developing, printing and scanning services from Blue Moon Camera and Machine
- 15% off 7Artisans products: The lens and accessory maker is offering a sweet discount for Phoblographer's readers.